Apply security update to Citrix ADC (CTX276688)

Reading Time: 4 minutes

At the time of writing this blog post Citrix released information about 11 new vulnerabilities discovered in their NetScaler line of products including Citrix Application Delivery Controller, Citrix Gateway, and Citrix SD-WAN WANOP. As sysadmins we want to keep our infrastructure secure and in this blog post I will show you how to apply the security update to the Citrix ADC (CTX276688) and mitigate for these vulnerabilities.

What to do now? Simple, upgrade to the latest version of Citrix ADC firmware. At the time of writing that is NS13.0 Build 58.32. Let me show you how.

If you followed my recent post Upgrade Citrix ADC firmware using CLI and you upgraded your Citrix ADC to version 13.0-58.30 according to my blog post then you should already be fine! Yay! The newly discovered vulnerabilities are documented in the Citrix Support Knowledge Center and is know by the number CTX276688. According to Citrix these vulnerabilities can only be exploited in very unique situations and circumstances and as far as they know, they are not yet used in the wild. I will show you how to upgrade Citrix ADC to the patched firmware and keep hackers at bay.

Preparation

We will use the same steps from my blog post Upgrade Citrix ADC firmware using CLI. The difference now is that I will do the upgrade from version 13.0 Build 58.30 to the latest release version 13.0 Build 58.32.

Download the latest firmware

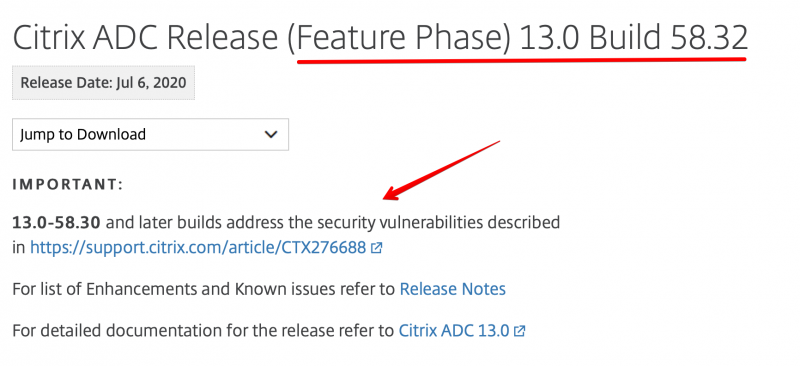
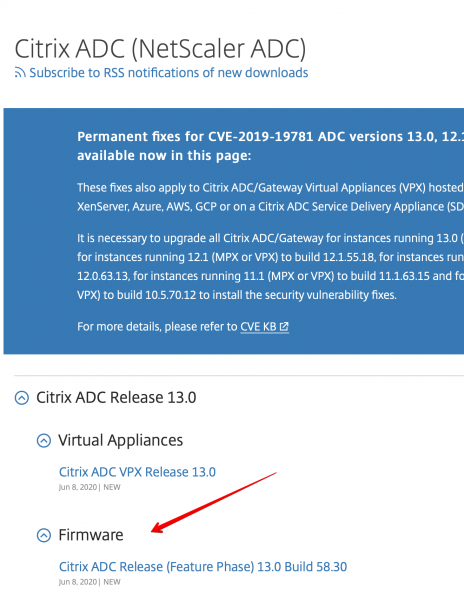
According to Citrix we need to upgrade our ADC with version 13.0 Build 58.32. You can find that firmware here. If you open up that page you will see the important message regarding CTX276688:

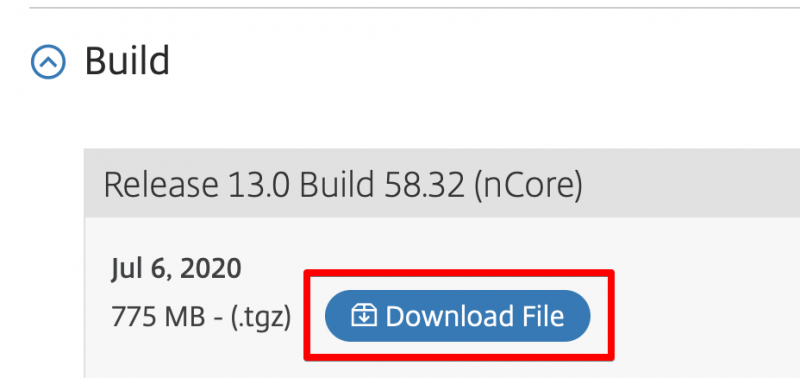
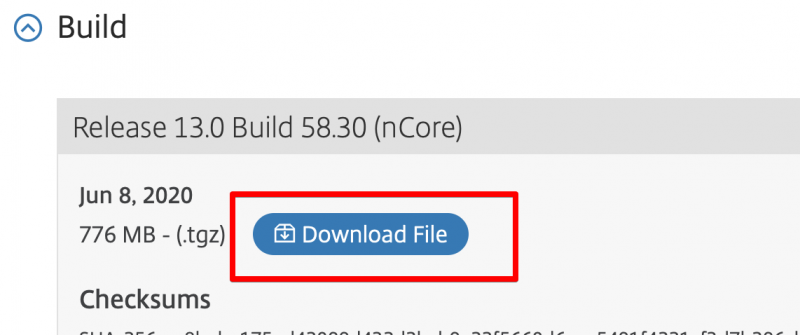
Download the firmware and safe it to your computer. We will upload this file to the ADC and then start the upgrade.

Backup your current configuration

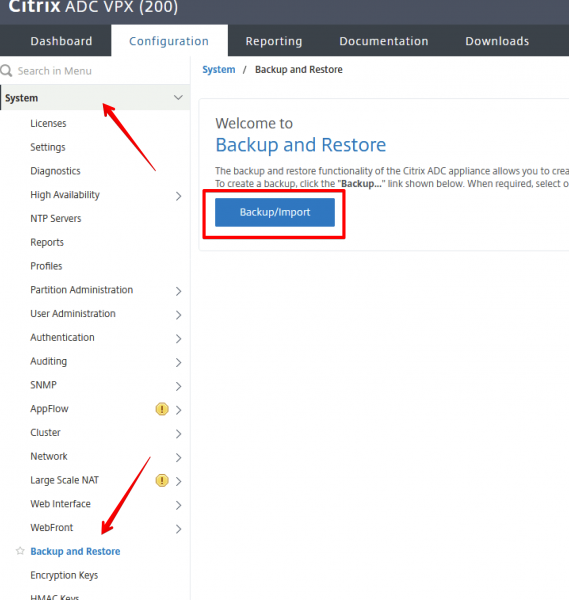
Before we start the upgrade process we need to backup the current configuration. You can do that using the steps I described here.

Start the upgrade

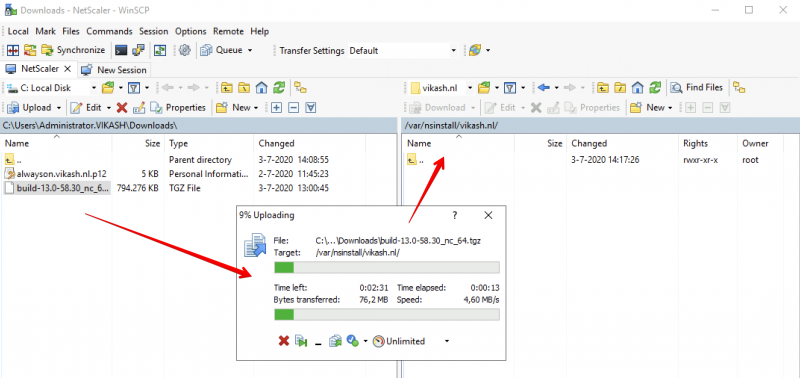
I am a big fan of CLI when it comes to upgrading these NetScaler appliances. But first we need to upload the new firmware to ADC. You can use the steps described here.

Start the upgrade script

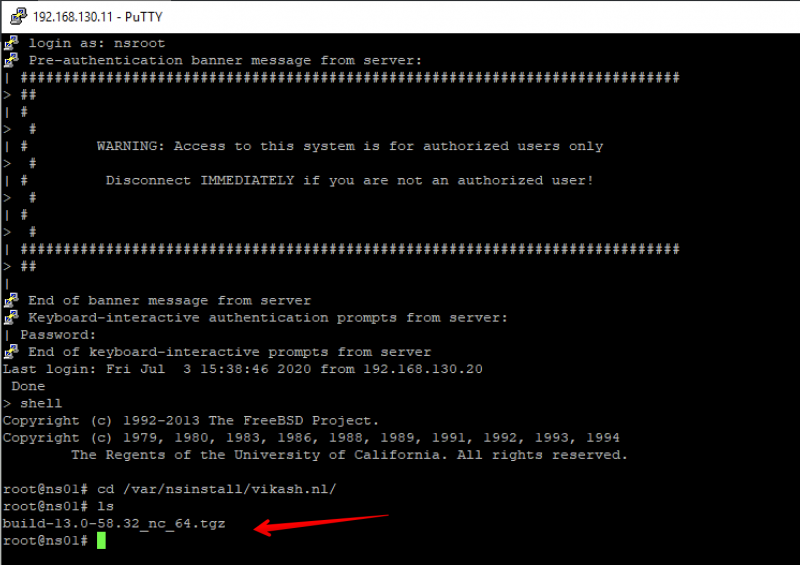
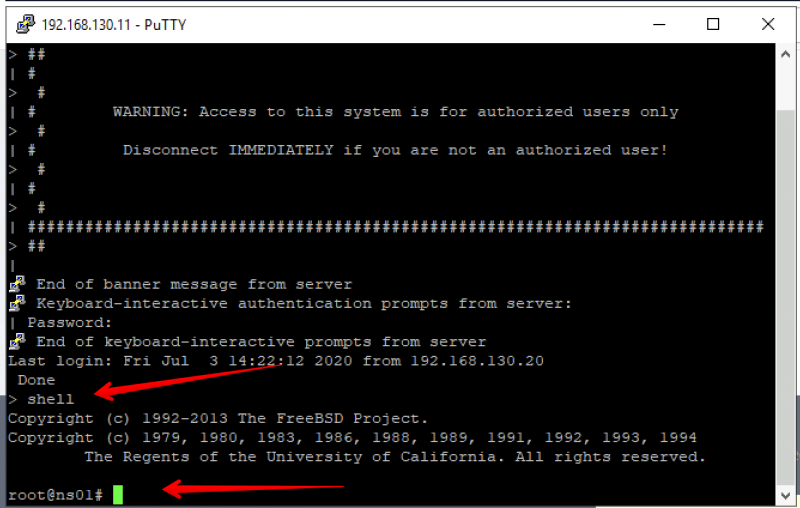
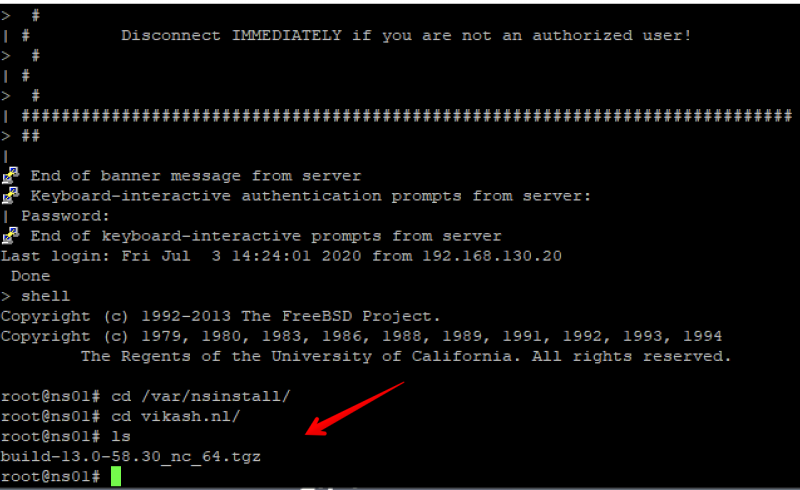
Login to the ADC using SSH. I use Putty for this. After login in you need to go to the directory where you uploaded the new firmware file. If you followed my post that should be somewhere in /var/nsinstall/<directory_name>. I have uploaded my firmware to the directory /var/nsinstall/vikash.nl:

We can see the new firmware there. Now extract it using the following command:

tar –xvzf  build-13.0-58.32_nc_64.tgz

The tar -xvzf is the command you need to extract the file with name build-13.0-58.32_nc_64.tgz. Remember to replace the filename with the correct one. After the firmware is extracted you will have a lot of files there. The one we need is names installns. In your SSH / Putty session enter the following command to start the upgrade process:

./installns

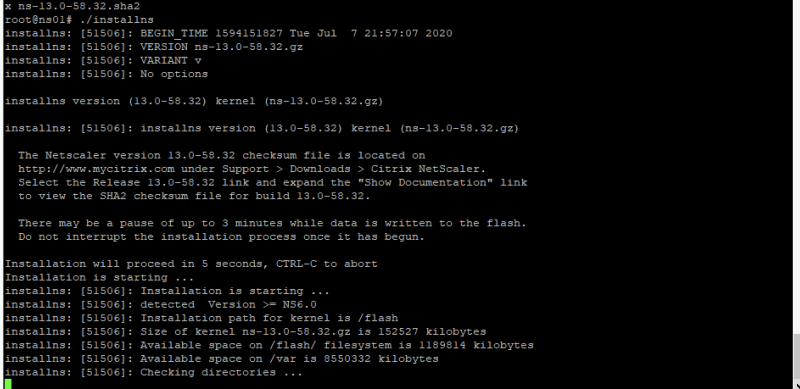
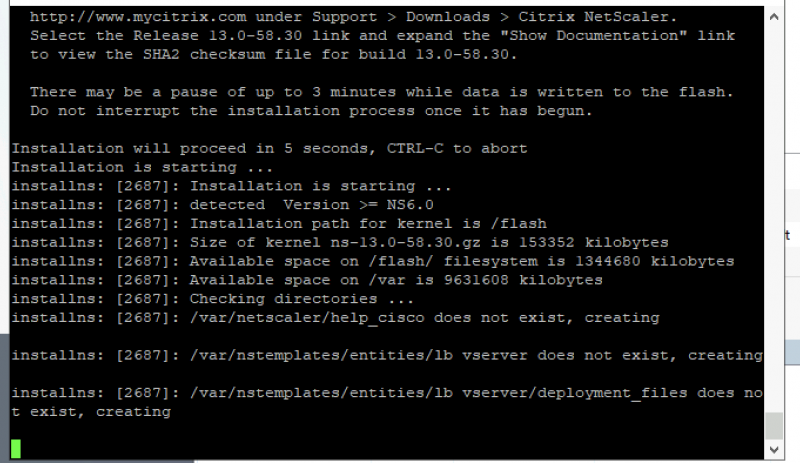
The command start with a . yes. After typing in the command you will see the a similar screen like the one below indicating that the upgrade has started:

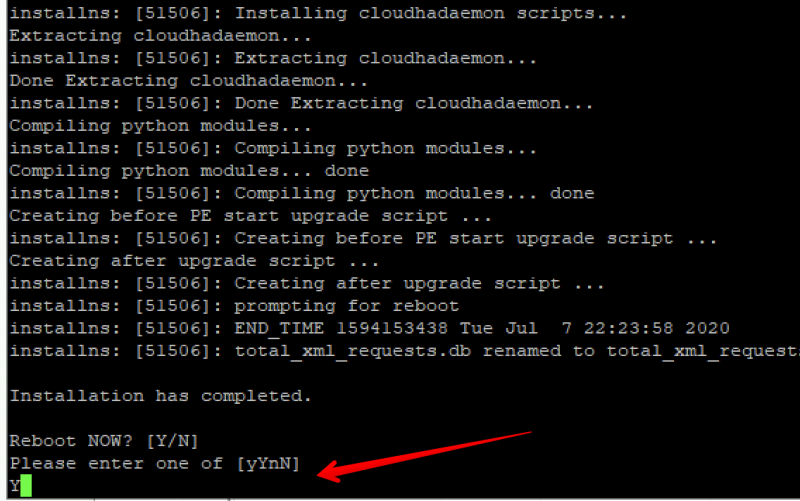
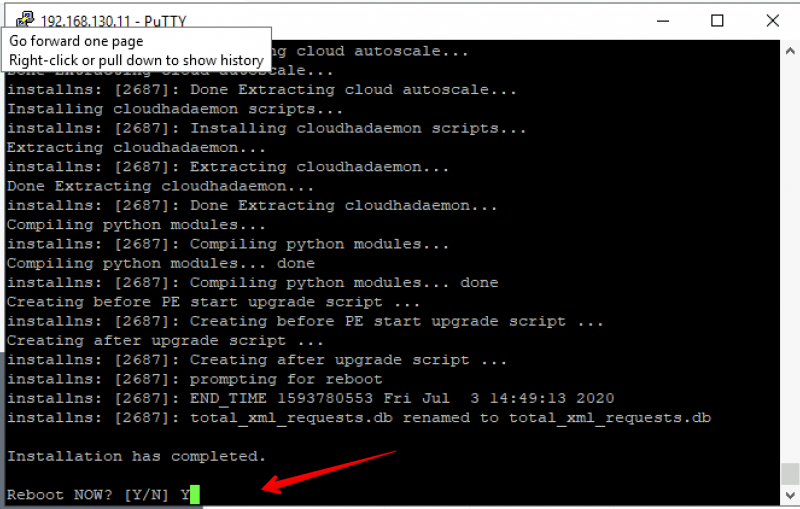
The update process will take a while. When the upgrade is finished you will be prompted to reboot the ADC. Enter Y and hit enter:

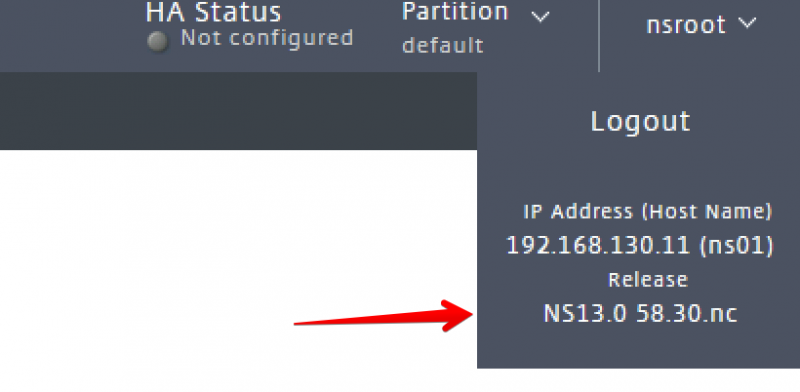
After the reboot let’s check the version and make sure everything went well. Open the management page (webgui) and check the firmware version:

You can check it using CLI. Login using SSH / Putty and enter the following command:

show ns version

You should get the following output displaying the firmware version of ADC:

If the version displays NS13.0 Build 58.32 then your ADC is protected from the vulnerabilities as described in CTX276688.

Steps for updating a Citrix ADC High Availability pair (HA)

The steps described in this blogpost apply in general for the ADC nodes which are running in a High Availability pair configuration. Every node can be upgraded using the same method I described in this post. Make sure you to upgrade the individual nodes in the following order:

  • Upgrade the secondary node first.
  • Reboot the secondary node.
  • Disable HA-sync on the secondary node using cli: set ha node -hasync disabled.
  • Upgrade the primary node.
  • Reboot the primary node.
  • Check that all the config is still there after the reboot of the primary node.
  • Enable HA-sync on the secondary node using cli: set ha node -hasync enabled.
Apply security update to Citrix ADC (CTX276688) Read More

Upgrade Citrix ADC firmware using CLI

Reading Time: 5 minutes

When running Citrix ADC it is vital to keep the ADC up-to-date. Usually Citrix ADC is very secure but every now and then they will discover bugs. That is when you need to update the firmware of the system. In this blog post I will show you how to upgrade Citrix ADC firmware using Command Line Interface (CLI).

Why do it using the CLI of there is a nice option in the webgui? In my experience doing it using the CLI is the most reliable way of getting the job done. The webgui is just not stable enough because on numerous occasions I have seen an upgrade fail when doing it using the webgui. And when such a system is running a crucial part of your infrastructure you don’t want to end up with a broken ADC. The CLI way has been rocksolid and delivers every time. It is not hard to do it if you follow the steps in this blog post.

Preparation

I will perform the upgrade on my ADC running in my lab environment. The version I am running here is 13.0 52.24. I will upgrade to the latest version. At the time of writing this post the latest version is 13.0 58.30.

Download the latest firmware

Download the latest firmware from the Citrix website. When you visit the website choose for the Firmware option:

Then on the next page scroll down to the Build section and download the latest firmware:

Backup the Citrix ADC configuration

I’m sure you already know this but often this step is still overlooked. Backing up the components in your network infrastructure is a vital part of running an IT-infrastructure. Your backup strategy for Citrix ADC depends in the platform you are running it on. I have mine running on Windows Hyper-V 2019 so making a snapshot before starting the upgrade is pretty handy. I will also show you how to make a backup of the ADC configuration from the webgui. Making a backup using the webgui has always worked in me experience so no need for CLI here.

Login to the webgui and in the left menu expand System and click on Backup:

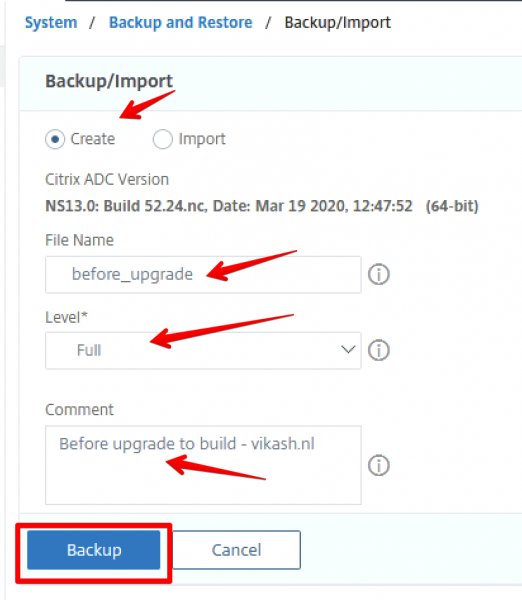
Then click on Backup/Import button. You will be presented with several options. Enter a file name for the backup and something in the description that makes is easy to see why this backup was made. The most important part here is to select the Full backup level. Then click on Backup:

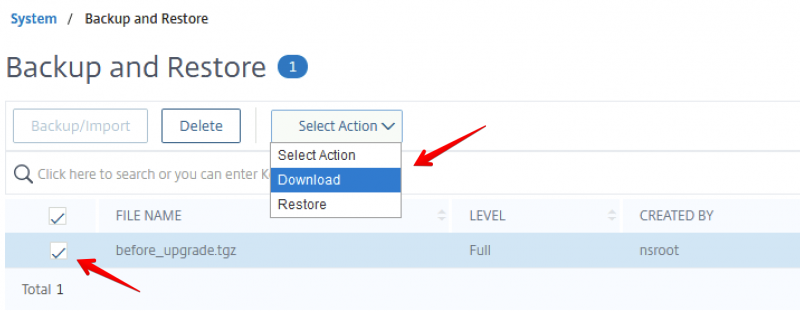
Now that the backup is made we need to download it from the ADC and keep is somewhere safe. Do this in case the upgrade does fail and you are not able to access the ADC using webgui of ssh. You will see an overview of all backups available on the appliance once you clicked on the Backup button as seen in the screenshot above. Select the backup you just made and from the action menu select Download to save the backup file to your local computer:

Start the upgrade

We have done our preperations and now we need to get the firmware we downloaded on the ADC and start the upgrade process.

Upload the new firmware

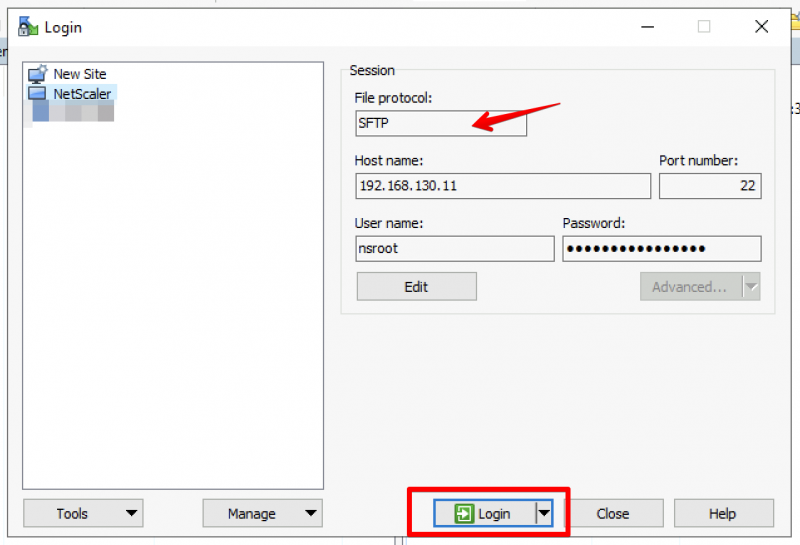
I use WinSCP to upload the new firmware to my ADC. Start WinSCP and login to your ADC using the option SFTP option:

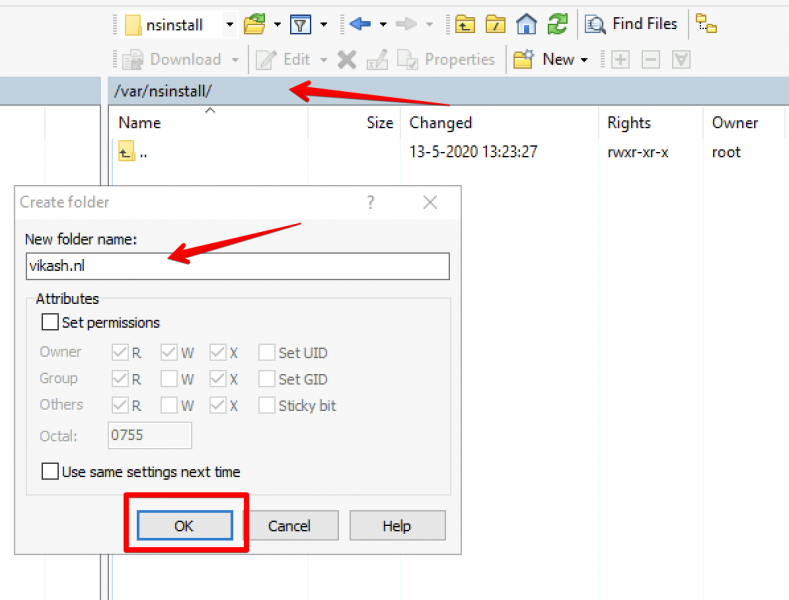
After loggin in go to the /nsinstall directory and create a new directory there:

Upload the firmware using WinSCP:

Start the upgrade script

Login to the ADC using SSH. I use Putty for this. After login in you need to go to the directory where you uploaded the new firmware file. First enter the command shell to enter a shell:

Go to the directory where you uploaded the firmware file using WinSCP. On my ADC that is /var/nsinstall/vikash.nl:

We can see the new firmware there. Now extract it using the following command:

tar –xvzf build-13.0-58.30_nc_64.tgz

The tar -xvzf is the command you need to extract the file with name build-13.0-58.30_nc_64.tgz. Remember to replace the filename with the correct one. After the firmware is extracted you will have a lot of files there. The one we need is names installns. In your SSH / Putty session enter the following command to start the upgrade process:

./installns

The command start with a . yes. After typing in the command you will see the a similar screen like the one below indicating that the upgrade has started:

The update process will take a while. When the upgrade is finished you will be prompted to reboot the ADC. Enter Y and hit enter:

After the ADC has rebooted login using the webgui and check the firmware version to make sure the upgrade was successful:

How do I do it for ADC’s in a High Availability pair?

The steps described in this blogpost apply in general for the ADC nodes which are running in a High Availability pair configuration. Every node can be upgraded using the same method I described in this post. Make sure you to upgrade the individual nodes in the following order:

  • Upgrade the secondary node.
  • Reboot the secondary node.
  • Disable HA-sync on the secondary node using cli: set ha node -hasync disabled.
  • Upgrade the primary node.
  • Reboot the primary node.
  • Check that all the config is still there after the reboot of the primary node.
  • Enable HA-sync on the secondary node using cli: set ha node -hasync enabled.

Upgrade Citrix ADC firmware using CLI is not that hard if you prepare beforehand and make sure that you have backups. Even upgrading nodes in a High Availability configuration is easy once you follow the steps in the same order as I described above. Good luck and stay safe!

Upgrade Citrix ADC firmware using CLI Read More

Enable secure LDAP for Citrix ADC with LDAP signature signing

Reading Time: 6 minutes

The case

In this blog post I will show you how to enable secure LDAP for Citrix ADC with LDAP signature signing policy in order to tighten security in your network. As most of you know Microsoft will be retiring insecure LDAP communication on domain controllers. Check the Microsoft article here for an in-depth explanation. You can also check the following articles about LDAP signature signing:

  • CVE-2017-8563 – Windows Elevation of Privilege Vulnerability
  • ADV190023 – Microsoft Guidance for Enabling LDAP Channel Binding and LDAP Signing

So insecure communications to Active Directory is going away and we all need to switch the components in our network (which are talking to Active Directory for authentication) to use Secure LDAP (LDAPS). LDAPS uses SSL or TLS to encrypt traffic. Because the LDAPS traffic is encrypted we don’t need to worry about someone intercepting the traffic. If you intercept it, it’s encrypted so you won’t be able to read it. This change then is a good thing!

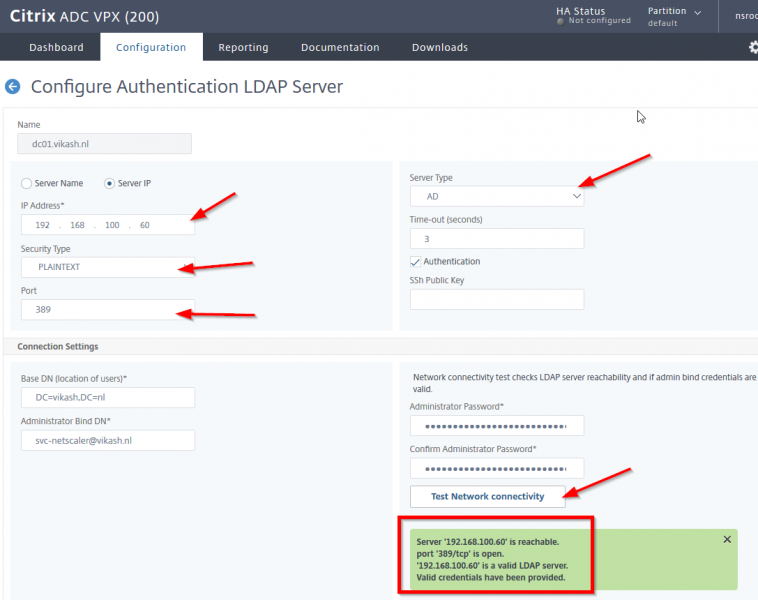
It so happens that a lot of ADC’s out there use insecure insecure LDAP to talk to domain controllers. As you can see in the screenshot below my own ADC has been setup to talk to my domain controller using insecure LDAP on port 389:

The screenshot above shows the basic LDAP server configuration pointing to my Active Directory domain controller. When I click the Test Network Connectivity button you see that everything is fine. This is the way a lot of these ADC’s are setup and when insecure LDAP to domain controllers is not working anymore somewhere during this year, this will break and that means that users will not be able to authenticate on you ADC and login to for instance Access Gateway VPN (if they are using that). In the end it will affect everything the ADC is providing your users with that require authentication from your Active Directory.

That’s why I will show you in this blog post how to get ahead of this change from Microsoft and prepare you Citrix ADC to Enable secure LDAP for Citrix ADC with LDAP signature signing.

What needs to be done

We need to reconfigure the ADC to use Secure LDAP (LDAPS). This can be done using that same insecure LDAP port (port 389) but tell the Citrix ADC to use TLS communication. Or you can choose to communicate to the Active Directory using port 636 and use the SSL option. The Active Directory only listens to LDAP with SSL encrypted traffic on port 636.

What group policy are we talking about

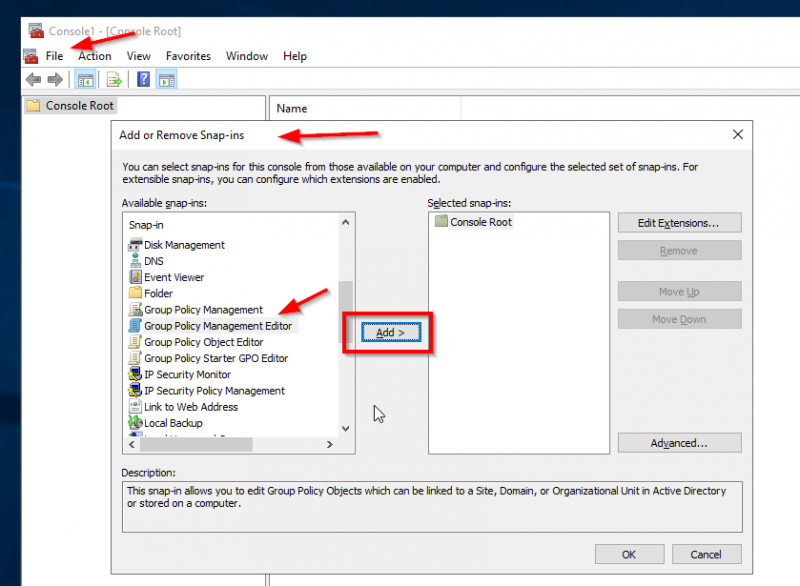
Ok all those articles are fine but let’s get pragmatic and let’s find the policy on the domain controller which will (somewhere this year) block insecure LDAP. In the end you want to know what will cause the problem and how to resolve it. Let me show you. To find the policy start mmc.exe on your Active Directory domain controller. Then click on File -> Add or Remove Snap-ins and find the Group Policy Management Editor. Click on Add:

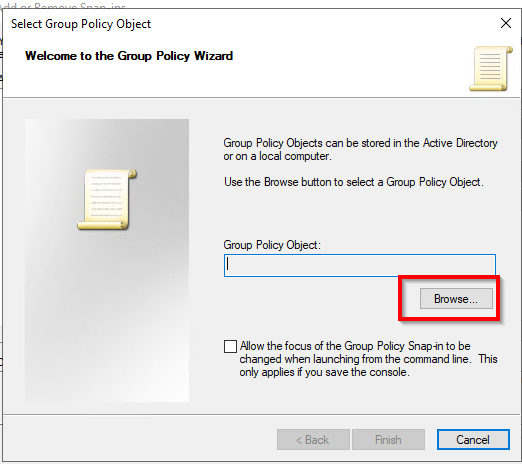
Click on Browse:

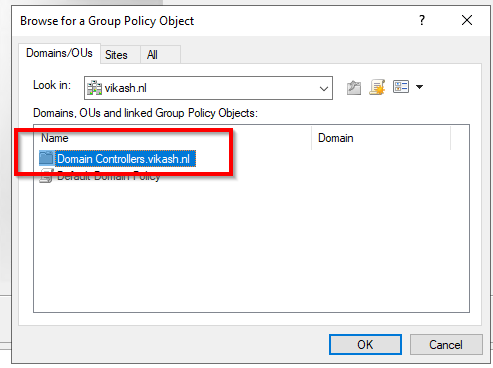
Make sure you doubleclick the Domain Controllers folder here! You will see that the folder has the name of your domain in it. In my case it is Domain Controllers.vikash.nl:

Once you are in the folder you will find the policy we are looking for. The name should be Default Domain Controllers Policy. Select that and click on OK and then Finish. Finally click on OK and you should see the mmc showing you something like this:

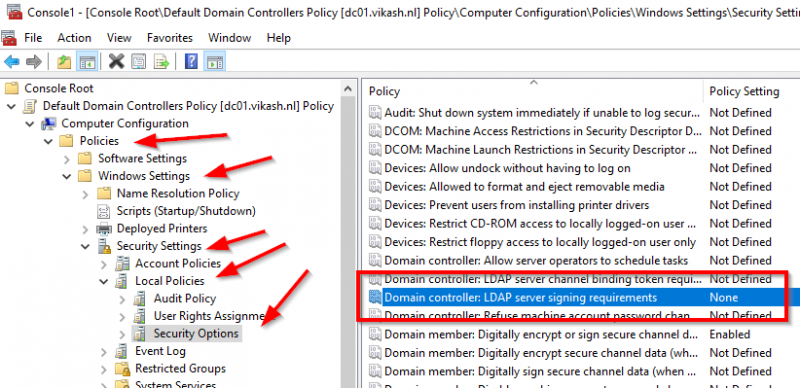
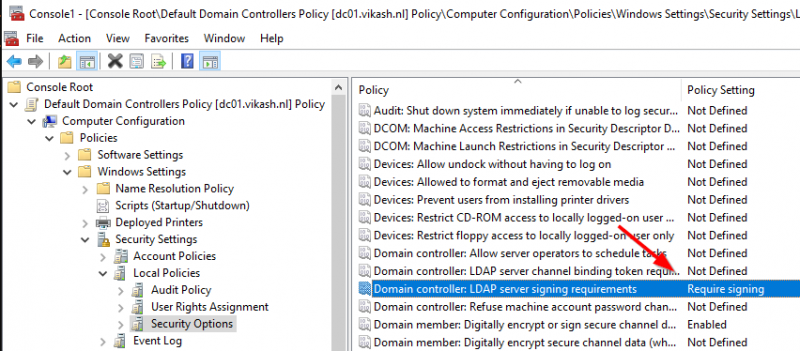
The policy setting Microsoft is going to change in order to enforce Secure LDAP is named Domain controller: LDAP server signing requirements. Find it under Computer Configuration -> Policies -> Windows Settings -> Security Settings -> Local Policies -> Security Options:

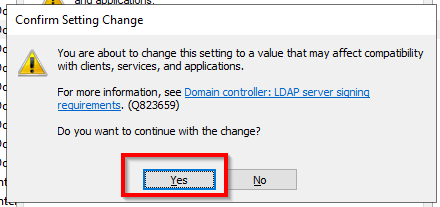
You can see that the setting here is None. This is the default setting and Microsoft eventually will change this to Require signing and in the basic this is all there is :). So for testing purpose let’s change the setting to Required signing and re-test our LDAP Server setting on the Citrix ADC. Note that when you change the setting to Require signing you will get a popup with a warning message. Click on Yes:

Now the setting is changed and Secure LDAP is being enforced because now it says Require signing. The policy setting will look like this:

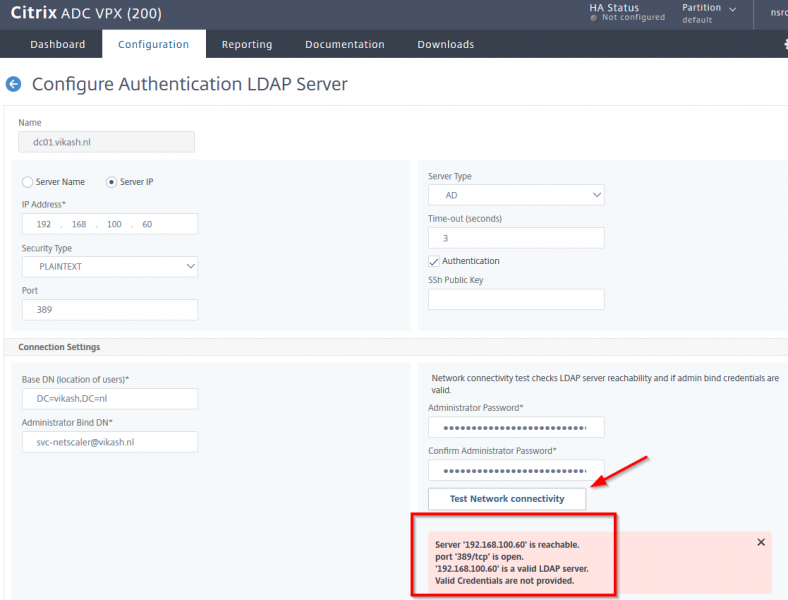
Head over to the management webgui on the ADC and go to the Authentication LDAP Server page and click on Test Network connectivity. It will show an error which basically tells us that the Active Directory domain controller is not accepting insecure LDAP anymore:

Ok now we have the policy on the Active Directory to require LDAP signature signing and the expected error on the ADC when we make a PLAINTEXT LDAP request. Now I will show you how to fix this.

Domain Controller Certificate

Before we can do secure LDAP requests to our Active Directory Domain Controllers we have to make sure that the domain controller is using a Certificate. This is a requirement so make sure that this is working and in place. On my domain controller I am running AD Certificate Authority Role (CA):

The CA role allows me to easily issue certificates in my domain. In the screenshot below you can see that I have a certificate issued and activated on my domain controller:

Note that if you don’t have a certificate on your domain controller installed and active you will not be able to let the Citrix ADC do secure LDAP requests.

Enable Secure LDAP on Citrix ADC

Ok now we have our certificate setup on our domain controller and let’s continue to setup secure LDAP on ADC. You can do secure LDAP on port 389 with TLS or switch to port 636 with SSL. Please keep in mind that, depending on which of the below solutions you choose, you might have to adjust firewall rules.

Secure LDAP using port 389 with TLS

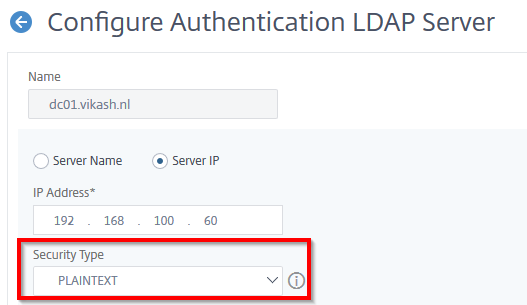
If your ADC is setup to use insecure LDAP it is doing this using port 389. You will see in the management webgui of the ADC that Security Type is set to PLAINTEXT:

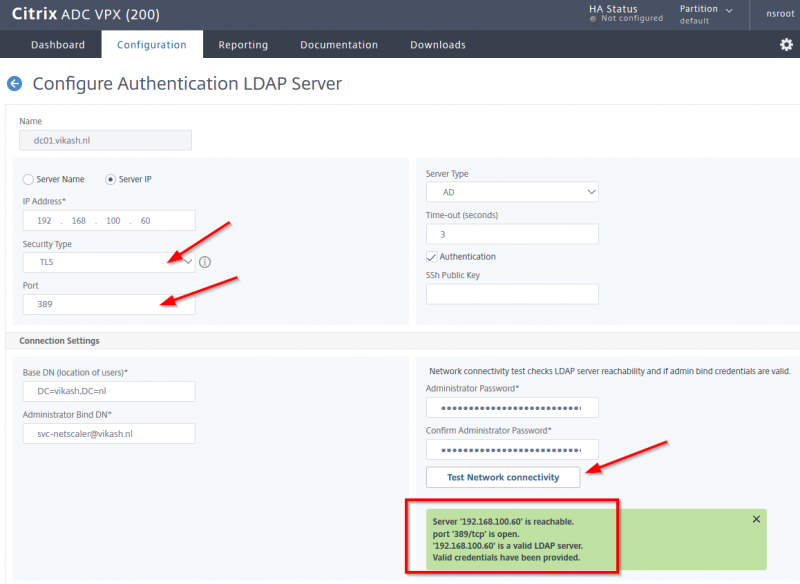
So LDAP on port 389 can either be insecure or secure. Now we want it to be secure so the only thing you have to change here is set the Security Type to TLS. You won’t even have to change your firewall rules and everything will be running fine. So set the Security Type to TLS and click on Test Network Connectivity:

You should get all greens now and no errors. Make sure to press OK on the bottom of this screen to save your changes.

Secure LDAP using port 636 with SSL

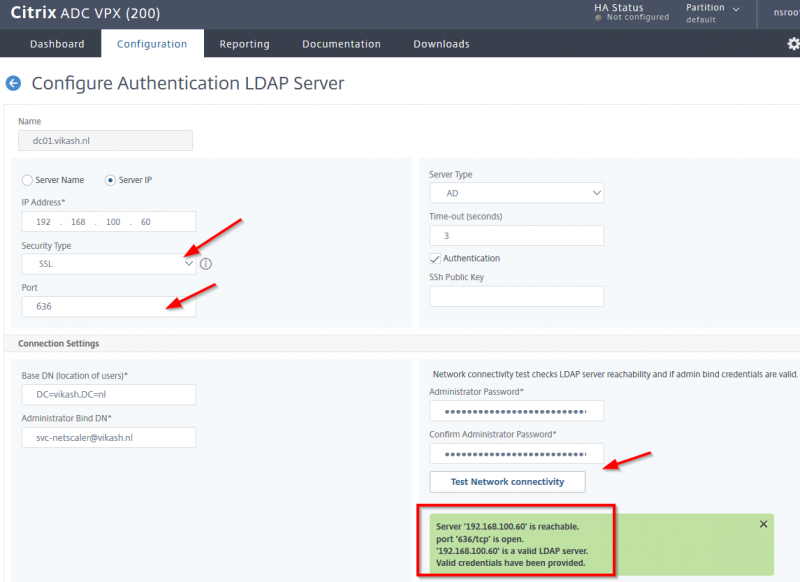
The other option is to switch over to port 636 for LDAP requests. All LDAP communication on port 636 require encryption unlike LDAP on port 389. So on the ADC management webgui navigate to the LDAP configuration server and not set the Security Type to SSL. You will see that the ADC automatically changes the port to 636. Click on the Test Network Connectivity button and everything should be fine and green:

Note that in the green field it will say that LDAP communication is making use of port 636 now. Make sure to press OK on the bottom of this screen to save your changes.

To sum up

Using Secure LDAP on the Citrix ADC not only gives you a better security but also gives you other advantages like allowing password changes for users. If your users are able to do password changes already then chances are that you already have everything in place for that moment when Microsoft decides to enforce LDAP signature signing. And if not then I hope this blog post has helped you enable secure LDAP for Citrix ADC with LDAP signature signing. Be secure!

Enable secure LDAP for Citrix ADC with LDAP signature signing Read More

Added value of Citrix Endpoint Management with Microsoft EMS/Intune

Reading Time: 4 minutes

What is going on?

As you know, that if you do anything with Enterprise Mobility Management and Office365 apps for Bring Your Own Devices (BYOD) or Company Owned Devices (COD), you can hardly do anything without Microsoft EMS/ Intune these days. We all know the most popular Office365 apps: Word, Excel, Outlook and PowerPoint. Other Office 365 apps like Microsoft SharePoint of Microsoft Dynamics 365 may be less popular but are still mission critical for organizations.

I have yet to encounter an organization that only uses Microsoft Office 365 apps on mobile devices. How about you? Mobile app deployment of most enterprise organizations these days looks like this:

  • Office 365 apps.
  • Other native mobile apps.
  • Custom build apps.
  • Web and SaaS apps.
  • Virtualized apps.

So, all these corporate apps have to be delivered to the end user on their device. It also means that you, as the company, want to have an insight in what is going on in these apps. The data in these corporate apps is yours, so you want to know how your data is being handled by the app on the user device? How is the user experience, regardless of internet being slow or even not available? Or on what platform does my app run? Your IT department wants to be able to answer all these questions.

How do we do it?

This is where Citrix Endpoint Management comes in! It allows us as IT to protect and isolate corporate data and apps from personal apps and data. Do you worry about how to deliver your corporate apps to the user? Stop worrying because with Citrix Endpoint Management comes with an app store. This is a secure and private app store specifically designed for the enterprise. In this app store you can use corporate apps and public apps. You need a public app to stay on a specific version for say compliance reasons? No problemo with the app store integrated in Citrix Endpoint Management. The Citrix Endpoint Management Appstore allows you to use apps from public app stores with your corporate policy on them! How cool is that.

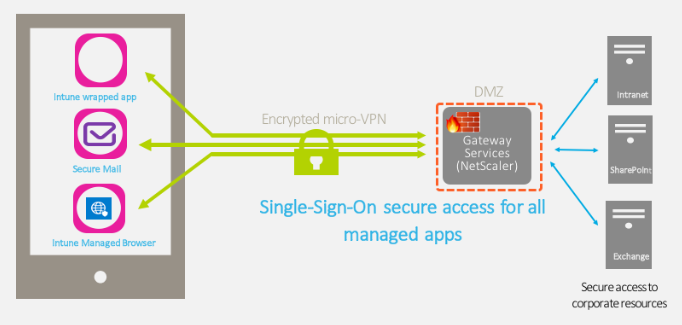
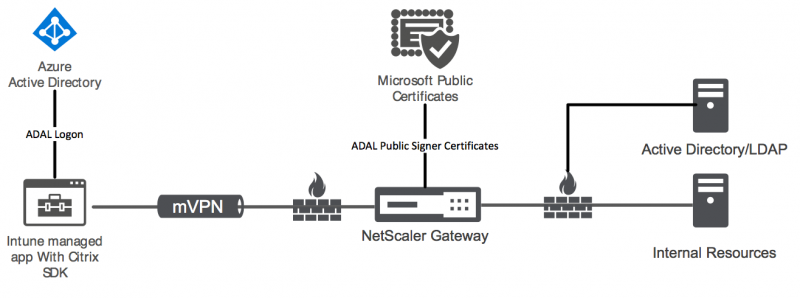
Citrix Endpoint Management also delivers functionality like exchanging data and documents between Office 365 apps and corporate apps. That is not all. Because Citrix Endpoint Management can deliver per-app-micro-vpn. Your IT department can guarantee how data in motion is being handled. This is where Citrix Application Delivery Controller (ADC) comes in play. Formerly known as NetScaler, ADC can provide per-app functionality for all the corporate mobile apps. See the diagram below.

Overview Citrix Gateway for micro VPN
Overview Citrix Gateway for micro VPN (Source Citrix)

Let’s say that your employee is on the other end of the world and needs access to that very important research document? No worries. ADC will make sure that the session to deliver that document to the mobile device is fully secured and encrypted. Also, when the document is on the mobile device, Citrix Endpoint Management will secure that data at rest. How cool is that!

Micro-VPN to on-premise data (Source Citrix)

Security nirvana does exist!

It does when you use Citrix Endpoint Management with Microsoft EMS/ Intune. I often get the question: Vikash, why do you need Citrix Endpoint Management when you have Intune? My answer then is simple: Do you want first-class security, enhanced user experience and flexibility for apps and devices? You need Citrix Endpoint Management with EMS/Intune.

Let me explain. With Citrix Endpoint Management we can see what is going on in the communications layer for every user and every session and every app. That means we can deploy access policies based on app, user or device. And with device I mean not only mobile devices but also laptops and tablets. All these devices in the end-user space can now be made fully compliant with your corporate IT security policy! Amazing.

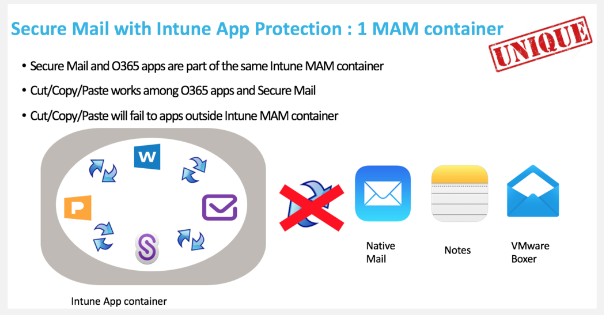
Interaction between Office 365 apps, ShareFile and Secure Mail (Citrix mobile apps) is seamless. Citrix makes that possible, because they use Microsoft EMS SDK. The data on the device stays in the secure enclave provided by Citrix Endpoint Management. While other vendors need to make a so-called bridge to exchange data between Office 365 apps and their corporate apps, Citrix mobile apps are “Intune-enlightened”. Below is an overview of the seamless interaction.

Secure Mail with Intune App Protection (Source Citrix)

I am convinced!

Let’s face it. If you have Office 365 apps running on mobile devices, then you need an EMS / Intune infrastructure! Because you want to know what happens with your corporate data on those devices right? No questions there, if you ask me. But nowadays with security being more and more a critical aspect for enterprises you want to be at your a-game. Citrix Endpoint Management enables you just to do that. Let’s talk bullet points here:

  • Do you have Exchange on-prem? Regardless you want the higher level of security with the per-app vpn option.
  • Security for data in motion and data at rest.
  • Fine grained setup of policies for Mobile Device Management and Mobile Application Management.
  • Seamless integration of all Office 365 apps with Citrix Secure Mail. It just works.
  • Single pane of glass to manage different devices and platforms.
  • Wide range of supported devices (MacOS, ChromeOS, tvOS, Raspberry Pi, Android, iOS, Windows 10).
  • Enterprise app store for all your corporate apps.

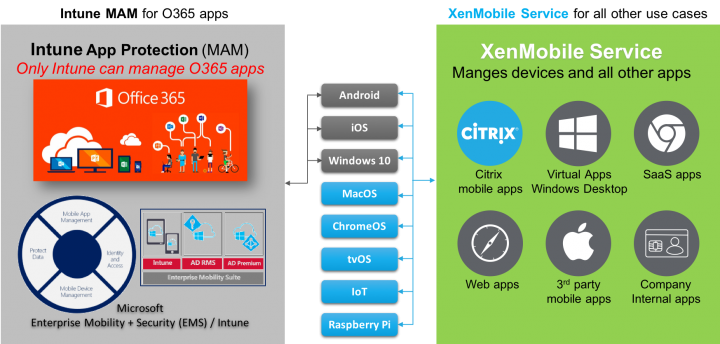
Below is an architectural overview of how Office 365 apps can be integrated with Citrix Endpoint Management.

Architectural overview (Source Citrix)
Added value of Citrix Endpoint Management with Microsoft EMS/Intune Read More

Setup Citrix NetScaler Gateway for Citrix XenMobile Server 10.9

Reading Time: 9 minutesIn this blog post I will show you how to setup Citrix NetScaler Gateway for Citrix XenMobile Server 10.9. You need Citrix NetScaler for XenMobile Server if you have the following scenarios:

  • Micro VPN access for access to internal resources.
  • Use Citrix Endpoint Management with Microsoft Intune/ EMS.
  • Micro VPN access for business apps to internal application servers or data.
  • Use XenMobile Apps for iOS or Android.

In this blog I will go through all the steps needed to successfully implement Citrix NetScaler for XenMobile Server, starting with importing the NetScaler appliance on my hyper visor and ending with a completed setup on the NetScaler ready for production. Before you start you have to setup and configure Citrix XenMobile Server 10.9. Check my blog post here to setup XenMobile Server 10.9.

Before we can start you have to make sure that you have the requirements in place. Nothing is more annoying than finding out that you forgot something during installation. This is the requirement list:

  • Minimum NetScaler 10.5 build 66.9. I am using NetScaler 12.1 build 49.23.
  • Platform/Universal license.
  • Public SSL certificate.
  • Several IP addresses. I will make a list for you.
  • DNS host names (FQDNs) which are accessible from the internet.

Let’s make a list of IP addresses we will need on the NetScaler. These IP addresses are all private IP addresses in my case, but also at customers I visit. This is because the NetScaler is always placed behind a firewall which does all the NAT stuff to map external IP to internal IP. So, in the end you will need a public IP of course which you will then map on your firewall to the NetScaler. This goes beyond this post. Check your firewall documentation how to do this. Below is the IP address list I will use for my setup:

FunctionIP address
NetScaler IP192.168.1.21
Subnet IP192.168.1.22
XenMobile Gateway Virtual IP192.168.1.23
XenMobile Gateway Virtual IP for MAM192.168.1.24
XenMobile Gateway Virtual IP for MDM192.168.1.25

Import Citrix NetScaler on Citrix XenServer

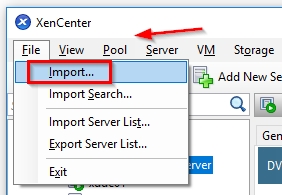
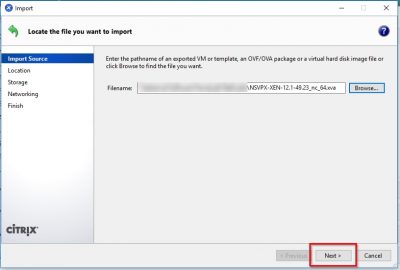
Make sure you download the correct NetScaler appliance (VPX) from Citrix. I have Citrix XenServer running so I downloaded the appliance for XenServer. Let’s start by importing the virtual Citrix NetScaler on XenServer. Start Citrix XenCenter and click on File->Import.

Locate the .xva file you downloaded from Citrix website. Browse to it and select it. Click then on Next.

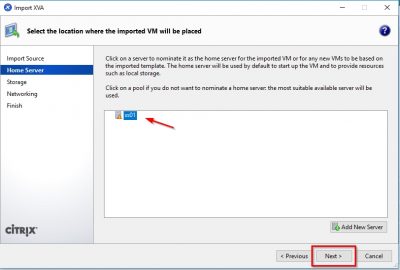
Select the XenServer host you will import the appliance to. I have only one XenServer host running in free-mode so I will use that. Click on Next.

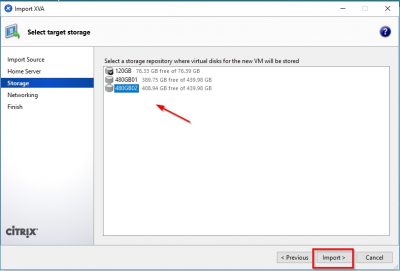
Select the storage you will import the NetScaler on. Click then on Import.

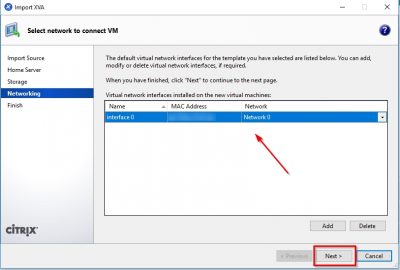
Select the network interface you will use to let the NetScaler appliance communicate on the network. Click then on Next.

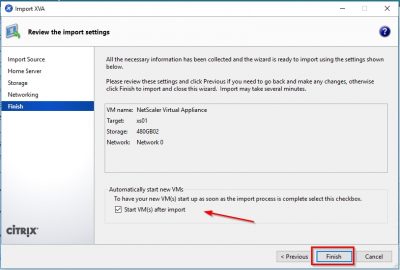
Review your selections and if everything is ok you can start the actual import. Check Start VM after import to continue the setup. Click here on Finish.

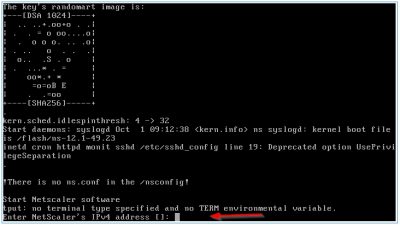
After the import is finished, go to the console using XenCenter. The appliance will boot and, on the command-line, will ask you to configure network settings. The IP address here is the one we reserved for the NetScaler IP (NSIP). Enter the IP and hit enter.

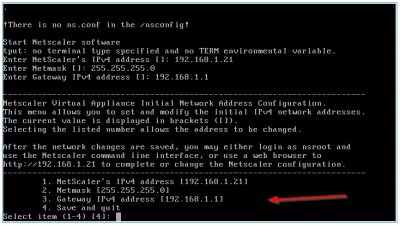
Enter all the network configuration information (like netmask and gateway) and choose option 4 to save. The NetScaler will now reboot. After the reboot we can continue the initial configuration using a web browser.

Initial setup Citrix NetScaler

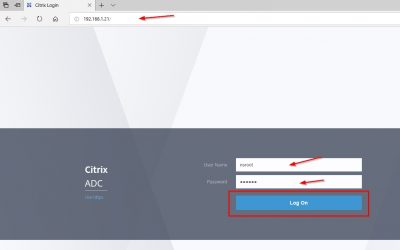
Open a web browser and go to http://<NSIP>. I am using 192.168.1.21 for my NSIP. Login using nsroot as username and nsroot as password. Make a note for yourself to change this after you are done with the configuration. Click on Log On.

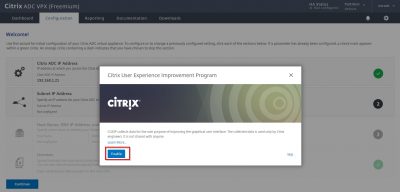
The initial configuration will automatically start, and you will be prompted to opt-in for the Citrix User Experience Improvement Program. I choose Enable but you can skip this of course.

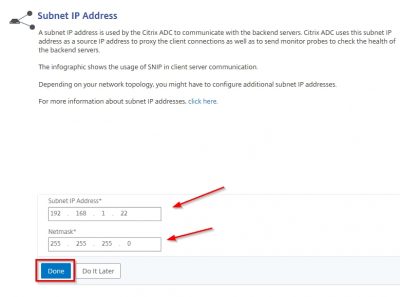
Next step is to specify a Subnet IP. Click on Subnet IP Address.

Enter the IP you reserved to be your subnet IP. I will use 192.168.1.22. Enter the corresponding netmask and click on Done.

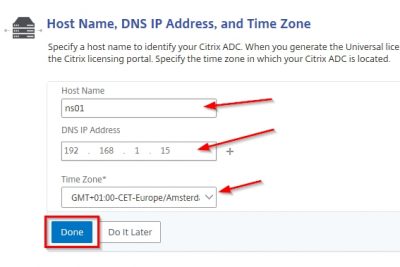
Next step is to configure DNS IP Address, host name and Time Zone.

Enter the information matching your environment. In my case my DNS server is 192.168.1.15. The Host Name can be anything you want, it does not matter because we are using a VPX. If you are using an MPX (physical NetScaler appliance) make sure to note the host name because then your license file is linked to the host name. In the VPX the license file is linked to the mac address the virtual network interface. That’s why the Host Name can be anything here. Select the correct time zone and click on Done.

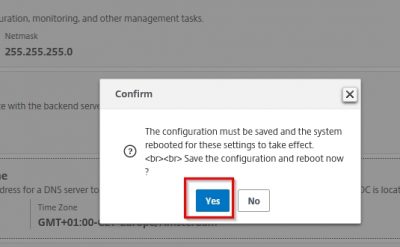
The NetScaler will reboot now to save the settings and let the changes take effect. Click on Yes.

Wait for it to reboot and leave the browser window open :).

Configure Licenses

The next step is to configure licenses. We need certain functions which are unlocked with the correct license for NetScaler. If you are only testing, you can go for a evaluation license for 90 days. During the evaluation period all the features of NetScaler are available to you. The features you need in NetScaler which require a special license are:

  • Load Balancing.
  • NetScaler Gateway for micro VPN and access to corporate resources.

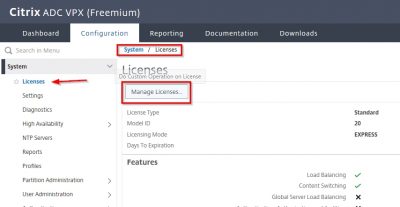
After the NetScaler has rebooted login with nsroot username and password. Go to System -> Licenses and click on Manage Licenses.

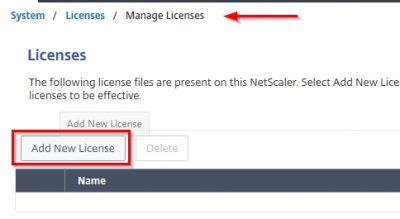
Click on the button Add New Licenses.

Choose the option Upload license file. You must allocate the license file first using the licensing tools in the Citrix website. Make sure that when you allocate the NetScaler license on the Citrix website, enter the correct Host ID. The Host ID is displayed on the right side of the window. It is the mac address of the virtual nic. If you have multiple virtual nic’s configured, it will be the mac address the nic which is first listed by in the properties view of the appliance. Click on Browse to locate the license file.

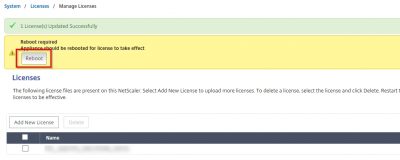
After the license file is uploaded the NetScaler needs to reboot to activate the license file and the corresponding features. Click on Reboot.

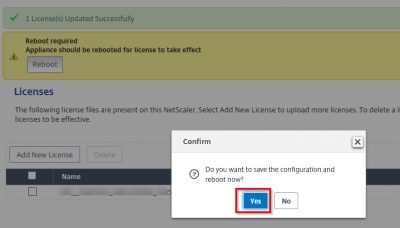
Click on Yes.

Wait for the reboot to finish. Leave your browser window open.

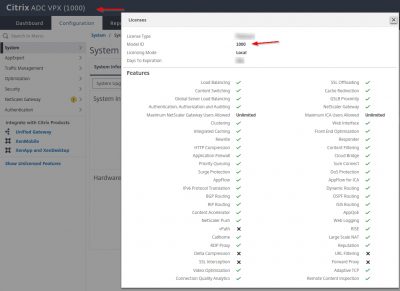
After you login you will see a overview of the new licensed features and the VPX version.

Import SSL certificate

Next step is to import your SSL certificate. I am using a wildcard SSL certificate. If you are not using a wildcard certificate, check my blog post about setup and configuration of XenMobile Server 10.9 here to see what hostnames (FQDNs) you need in your SSL certificate. In the past I have done a blog post and showed how to import an SSL certificate in .pfx format on the NetScaler. Check that blog post here.

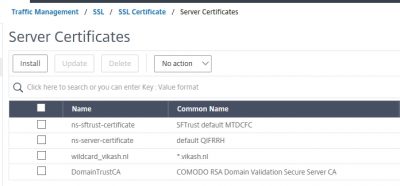
After I imported my certificate this is my SSL overview on my NetScaler.

Setup NetScaler for XenMobile

Now it’s time to setup the NetScaler for XenMobile. I have setup XenMobile Server 10.9 in a previous post here. In that blog post I showed you the ins-and-outs of the setup and configuration process of XenMobile Server. And to make the XenMobile resources available to our end-users we need to integrate NetScaler and XenMobile. NetScaler supplies an authentication mechanism for remote devices to the internal network and other MAM functionality.

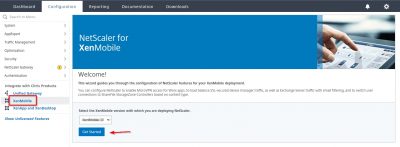
For my blog I will use the XenMobile wizard which is supplied with NetScaler. This wizard is very good at getting the job done (pragmatic approach) and gets better with every new version of NetScaler. Login in to NetScaler using your browser and scroll down in the left column and click on XenMobile. Then click on Get Started.

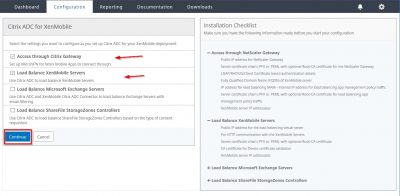
Make sure that the options Access trough Citrix Gateway and Load Balance XenMobile Servers are checked. Then click on Continue.

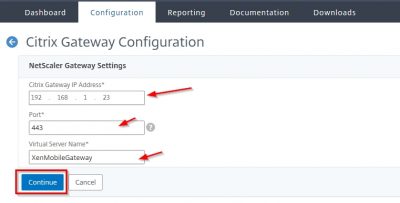
Enter the IP address you will use for the Virtual Server (VIP) for NetScaler Gateway. Leave the port on 443. Click on Continue.

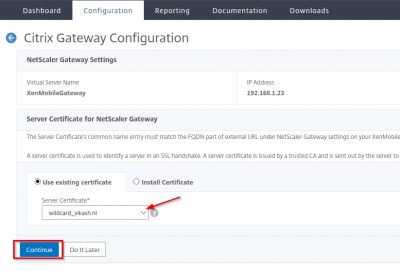
Select the certificate you want to use for the NetScaler Gateway VIP. This is my wildcard SSL certificate which I previously imported. Click on Continue.

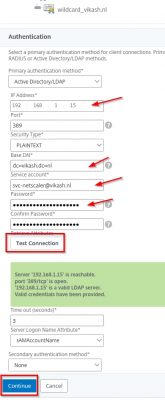
The next step is to add your Active Directory/LDAP configuration. This is used for by NetScaler for user authentication in your Active Directory. Make sure that you have a service account in your Active Directory configured which you will use here. Enter the information and Click on Test Connection to test the configuration. Everything should be green. Click then on Continue.

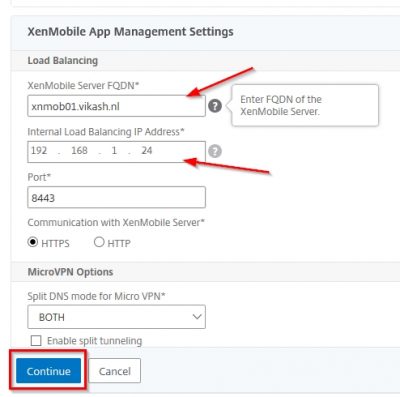
This next step will ask you the FQDN for you MAM functions. Fill in the same FQDN here that you used when setting up XenMobile according to my post here. In my case that is: xnmob01.vikash.nl. Also set the IP address you will be using for the Load Balancer. Click then on Continue.

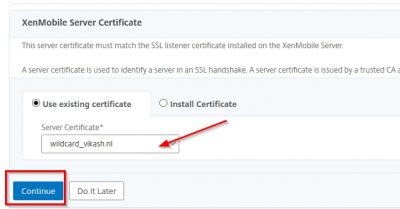
Next, we must select the certificate for XenMobile. This has to be same certificate you are using on your XenMobile server! In my case I have a wildcard running on my XenMobile Server and the same one on my NetScaler.

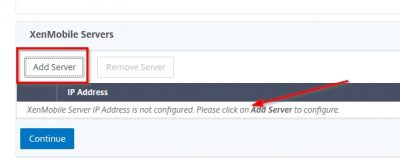
Now we have to tell NetScaler where the XenMobile server is. Click on Add Server.

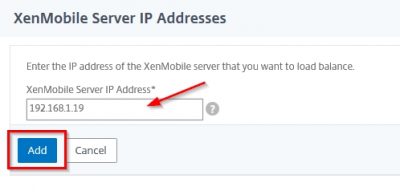
Specify the IP address for XenMobile Server. I have my XenMobile Server running on 192.168.1.19. Fill in the IP address and click on Add.

Now it will list the XenMobile Server. Click on Continue.

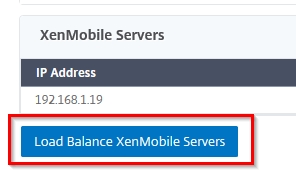
Click now on Load Balance XenMobile Servers.

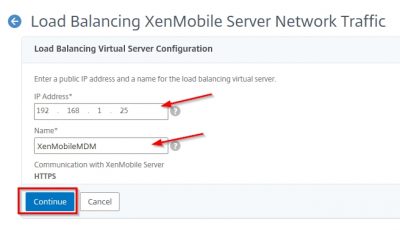
This is the IP address you will use to Load Balance MDM. Specify a name and then click on Continue.

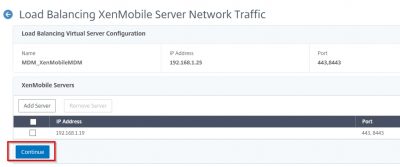
You will get an overview of the Load Balancing Virtual Server Configuration. Click on Continue.

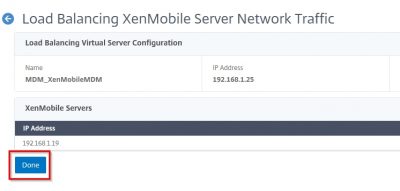
Then click on Done and we are done!

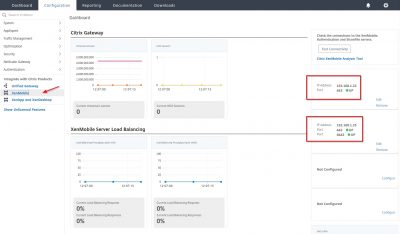
You will be taken to the Dashboard and see the configuration you made using the wizard.


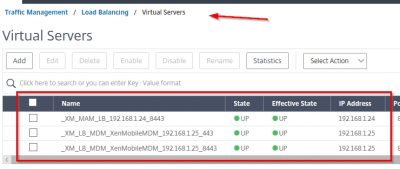
We can see the different components the wizard added. See below the screenshots to get an idea where they are in the NetScaler configuration.

This concludes this blog post. In following posts, I will show you how to enroll devices using XenMobile. Feel free to contact me of you have any questions or comments.

You can follow me on twitter or add the RSS feed from my blog and you will be notified when I add new posts.


Setup Citrix NetScaler Gateway for Citrix XenMobile Server 10.9 Read More

Setup Citrix Endpoint Management (Citrix XenMobile Server 10.9)

Reading Time: 14 minutesIn this blog I will show you how to setup Citrix Endpoint Management (Citrix XenMobile Server 10.9). The new name for Citrix XenMobile is Citrix Endpoint Management. This version was released by Citrix on the 13th of September 2018. A few things are new in this version:

  • Access to XenMobile Tools from the Console.
  • Add Google Play Store apps using a package ID.
  • New public REST API’s.

You can read all about what is new here. XenMobile Server is a complete Enterprise Mobility Management (EMM) solution that provides both Mobile Device Management (MDM) and Mobile Application Management (MAM) through a single virtual appliance. You can run the virtual appliance on XenServer, Hyper-V or VMware. It supports all the major hypervisors as you can see so you have no excuse there for not using it :). This version of XenMobile has a single management console for your devices, apps and data.

So before we can start the setup and configuration we have to make sure we meet the requirements:

  • One of the hypervisors I mentioned before.
  • 4x virtual CPUs.
  • 4GB RAM minimum. 8GB is recommended.
  • 50 GB disk space.
  • Citrix License Server 11.15.x or later.
  • MS SQL Server 2012 SP4 or higher (if you plan on using an external database).
  • SSL Certificate (with the hostnames we are going to use in this blog or you can just use a wildcard certificate).

So this will get your XenMobile server up and running. Depending on your needs you will need additional components like Citrix NetScaler or mobile applications. I will discuss this in upcoming blog posts.

Where am I running this setup? I have Citrix XenServer running in my testlab so I downloaded Citrix XenMobile virtual appliance for XenServer. In my test lab I have Active Directory running on Windows Server 2016. Nothing is redundant or high-available as this is just my test lab :).  Let’s start.

Import the virtual appliance

Locate the virtual appliance file you just downloaded.

Open Citrix XenCenter and choose File -> Import.
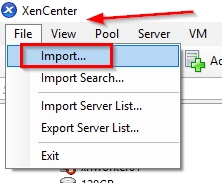
Click on Browse to select the virtual appliance file. Click on Next.
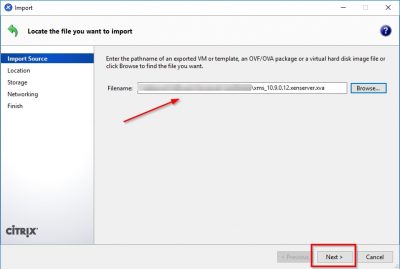
Select the XenServer host on which you want to import the virtual appliance. In my case I have only on host, so this is automatically selected. You might notice that there is an orange triangle displayed in front of my XenServer host. That is because I am running the free version of Citrix XenServer. The orange triangle reminds me that Citrix XenServer is running on “free-mode”. After selecting your XenServer host click on Next.

Select the storage repository on which the virtual appliance will be stored. Click then on Import to start the import process.
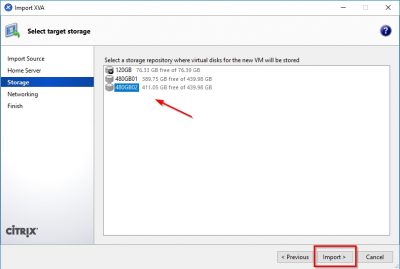
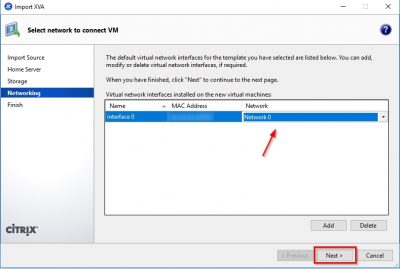
After the import you will be asked to select the network interface the virtual appliance will use to communicate on the network. Use the drop down in the Network column to select the network and then click on Next.
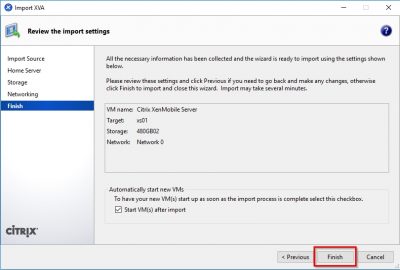
Check the information in the review window and then click on Finish. Notice that the checkbox Start VM(s) after import is selected. So, when you click on Finish here XenServer will spin up the virtual appliance.
First-time use wizard Citrix XenMobile Server 10.9

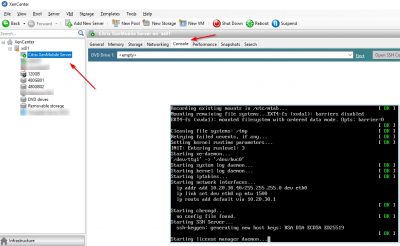
So, after the import has completed and the virtual machine has booted it is time for the first-time setup. This will be done using the virtual machine console in Citrix XenCenter. We need to setup the IP address and subnet mask, default gateway, DNS servers, and other settings for XenMobile using the command-line console in XenCenter.
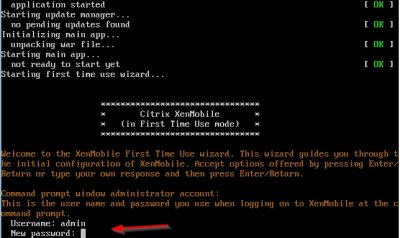
The wizard will start automatically, and you will be asked to enter a new password for the user “admin”. This is the default administrator user. Enter a password and hit enter. You will be asked twice to enter the same password. Hit enter after that and the wizard will continue.
Then you will be asked to enter the network configuration. After every entry hit enter. The IP address I will use in my test lab is 192.168.1.19. When you have entered all the network information you will be asked to commit the settings. Press y if you are sure and hit enter.
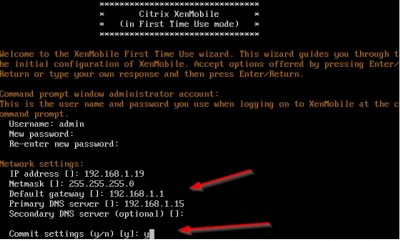
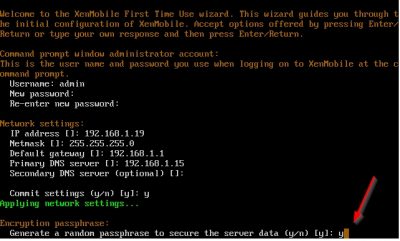
Then the wizard will ask you to generate a random passphrase to secure the server data. This passphrase is then used to encrypt, and decrypt part of data stored on the appliance. Note that you cannot view the passphrase if it is automatically generated. So, if you are planning to extend you XenMobile environment in the future make sure you enter your own passphrase! For now, I choose y because one XenMobile server is enough for a testlab. In my experience one XenMobile server is enough in production as well but of course this depends on your specific situation.
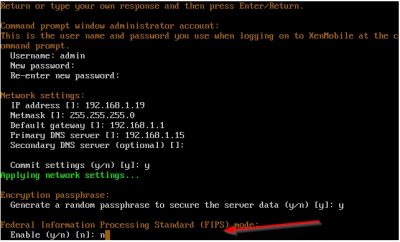
The wizard will now ask you if you want to enable FIPS (Federal Information Processing Standard). You need this if you must comply by law to security requirements for cryptographic modules used in security systems. Click here if you need more details on this. I don’t need this feature, so I select n and hit enter.
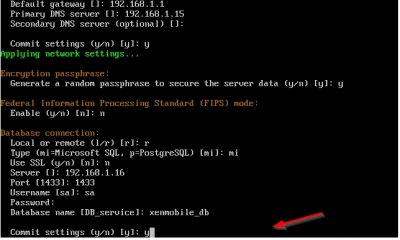
Next up the wizard will ask if you want to use a remote or a locale database. I am using a remote database because I have a dedicated Microsoft SQL server running in my test lab. Choose r for remote database. Choose mi for Microsoft SQL. Using Microsoft SQL is recommended in production environments by Citrix. Enter your database connection information and then press y to commit the settings.
The wizard will ask you if you want to enable cluster setup. This is the case when you have multiple Citrix XenMobile servers in your environment. Choose the setting that applies to your situation and hit enter. In my test lab I have enabled this, but I won’t be using it here.
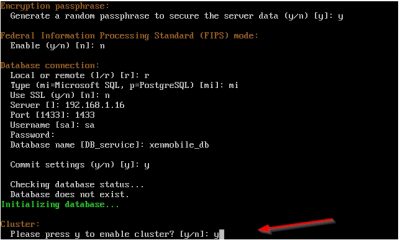
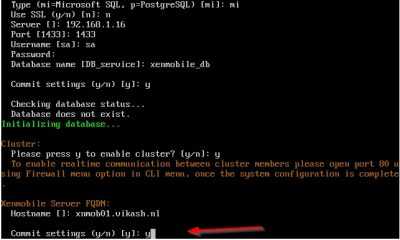
Next the wizard will ask you for the XenMobile Server host name. This is the host name all your users will connect to for enrollment. A common host name chosen here is “mdm.domain.name”. This is because this is the FQDN for Mobile Device Management (MDM) and it is easy to remember. In my case I am using xnmob01.vikash.nl. This name must be present in the SSL certificate you will use. If you are using a wildcard certificate you are fine. Press y and hit enter to commit the changes.
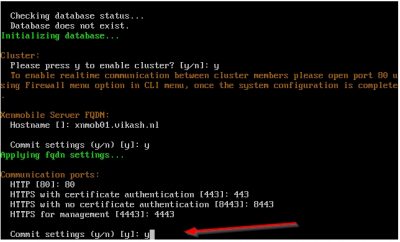
Next step is about the communication ports. I just leave this to the default ports and commit the changes by pressing y and hitting enter.
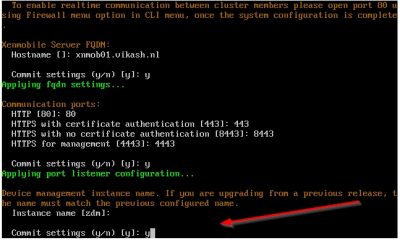
Enter the name you want to use for the device management instance. This is used to setup XenMobile Autodiscovery Service. I will set this up in a later blog. For now, I choose the default instance name zdm. Enter the instance name you want then press on y and hit enter to commit your settings.
The wizard will now setup the internal Public Key Infrastructure (PKI). It will automatically generate the required certificated (how nice is that!). Later on, we will add our own certificate. For now, choose y to use the same password on all the certificates it generates. Enter the password and then press y and hit enter to commit the settings.
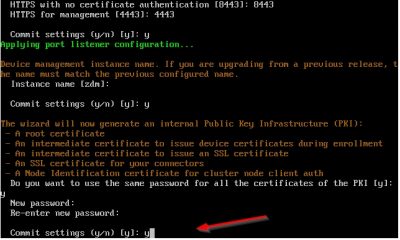
The wizard will now create an administrator account for logging on to the XenMobile console using your web browser. This is the account you will use to manage the XenMobile server from a web browser. I just choose the default username here (administrator) and entered the password I want twice. Once again press y to commit your settings.
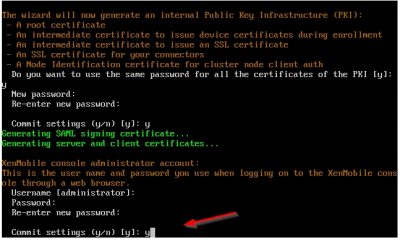
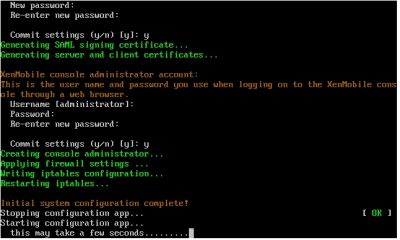
The wizard will continue with the setup and all you must do is wait.
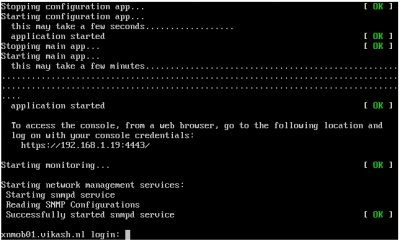
After the wizard completes the setup you will see a logging prompt. This means that everything on the command-line is setup and we can now continue the configuration using a web browser. This screen will also tell you what the URL is for the management console. In my case this is https://192.168.1.19:4443.
Continue setup of XenMobile Server 10.9 from web browser

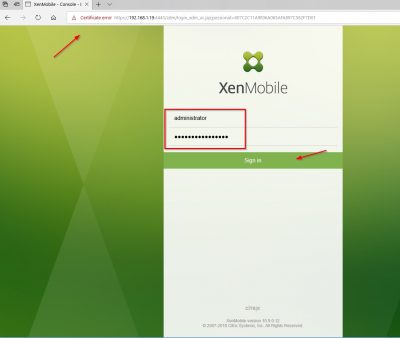
Next step is entering License information and adding SSL certificates. Open a web browser and go to the management console URL. In my case that is https://192.168.1.19:4443. You may get a prompt telling you that the certificate for this website is not trusted. You can safely ignore this warning. We know that this is the certificate which the setup wizard automatically generated using the internal PKI. Enter your administrator account details here and click on Sign in.
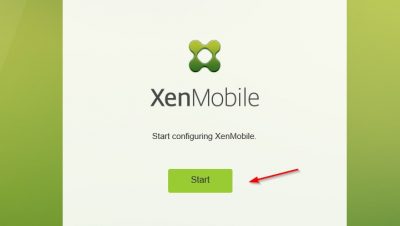
Click on Start to continue.
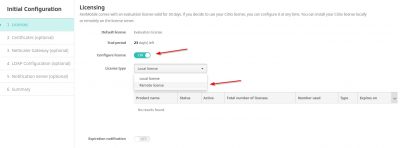
Configure a License for XenMobile

We must start with the license configuration. If you don’t have a license XenMobile will have a trial license for 30 days. If you have a Citrix License server running with XenMobile licenses, then click on Configure License and then choose Remote license.
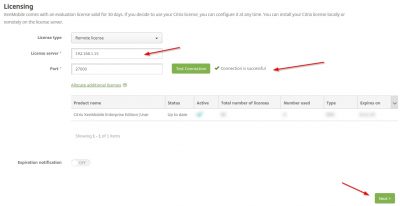
Enter the information of your license server and then click on Test Connection. If you have XenMobile licenses on your Citrix License server, they should appear here. Click on Next.
Install SSL certificate

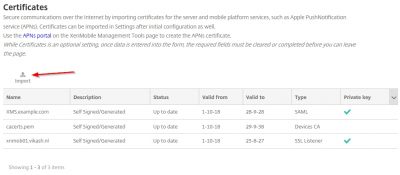
You will now be asked to import certificates. In this screen I will import my own wildcard certificate. This is the certificate I will be using for the MDM and MAM services made available using XenMobile Server. Later on in the post we will request and import the APNs certificate which is used for Apple’s Push Notification service. For now, click on import.
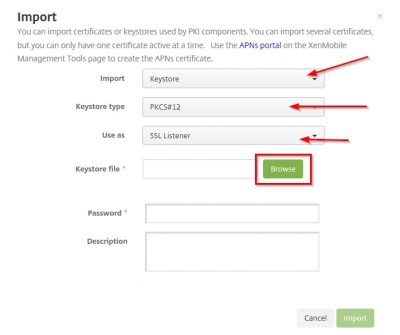
Now pay close attention here. The certificate you will be using for MDM and MAM, in my case my vikash.nl wildcard certificate, you must set it as the SSL listener certificate. And because I have my certificate in a .pfx format I will choose the option KeyStore as import method. I suggest you use the .pfx file format also as it makes life easy when dealing with SSL certificates. Set the KeyStore type to PKCS#12 and set Use as to SSL Listener. Then click on Browse.
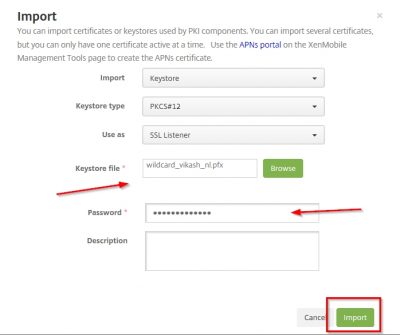
Locate your .pfx file, enter the encryption password for the .pfx file and click on Import.
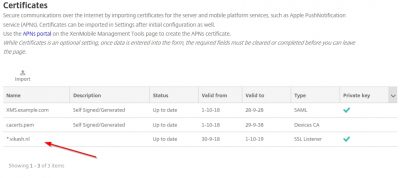
You will get a warning popup about replacing an existing SSL Listener certificate. Because we don’t have one in place, yet this warning can be dismissed. If you are renewing SSL certificates (like in a production environment) pay extra attention here. In that case make sure that the FQDN names are the same in the renewed SSL certificate! We can click on OK here. The Certificate window will now list your SSL certificate. In my case it is my wildcard certificate. You will see that XenMobile Server also has selected my SSL certificate as the SSL Listener and informs me that is has the private key as well. Very nice.
Install an APNs Certificate

Before we install the APNs certificate we need to request it. First, we need a Certificate Signing Request (CSR) file. I will do this using Microsoft IIS on a Windows Server 2016 webserver I have running here (named STF01). Open Internet Information Services (IIS) Manager and select Server Certificates.
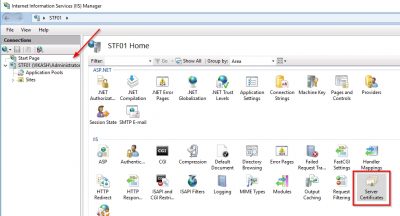
Click on Create Certificate Request.

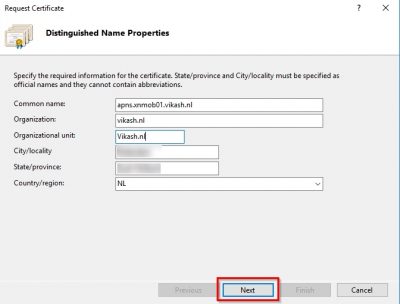
The Common name is important. You must be able to reach that later on from the internet. Fill in the information in the required fields and click on Next.
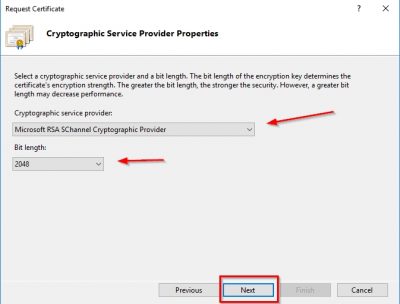
Select Microsoft RSA SChannel Cryptographic Provider for the Cryptographic Service Provider and 2048 for bit length. Then click on Next.
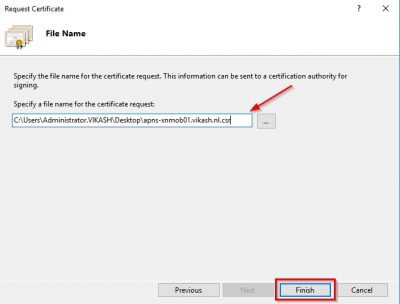
Specify the location and filename to save the CSR file. Click Finish. Leave the IIS manager console open in this view. We will come back to this later.
Now we must upload the CSR to Apple. Go to https://tools.xm.cloud.com/ and log in with your Citrix account. Click on Request pus notification certificate signature.
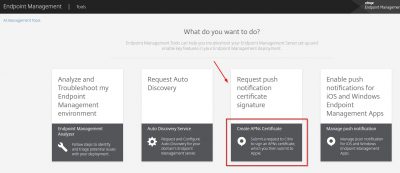
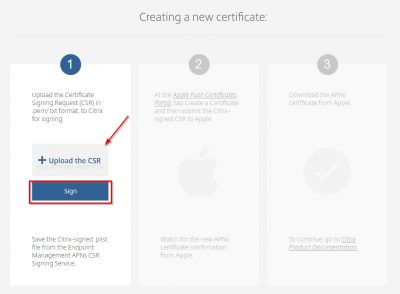
Before we upload the CSR make sure to change the file extension to .txt (or .pem) otherwise it will not sign. Then click on Upload the CSR to locate the CSR you generated in the above steps. Then click on Sign.
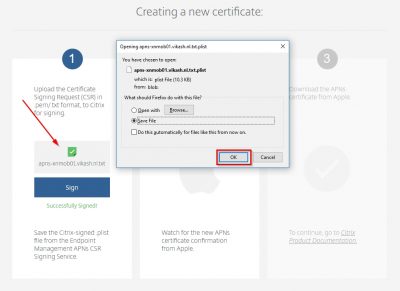
You will see a message that the CSR is successfully signed and you will be prompted to save the singed file (or it will be automatically saved in your browser download directory). This file will have the extension .plist.
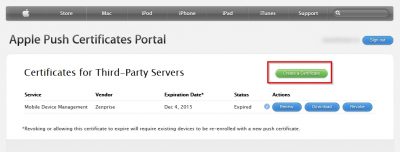
Click on the second column on the bold and underlined text Apple Push Certificates Portal to head over to the Apple Push Certificates Portal. It will open in a new tab or window. Sign in using you Apple ID to continue.
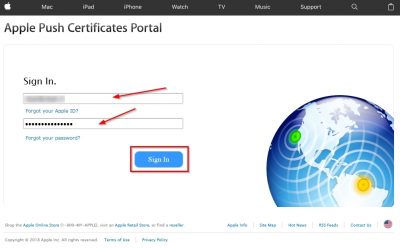
Click on Create certificate to start.
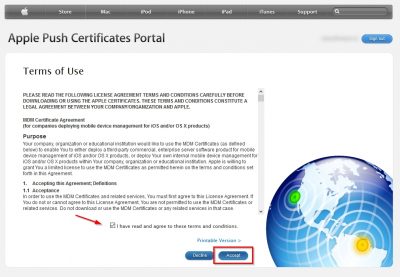
Agree with the Terms of Use and click on Accept.
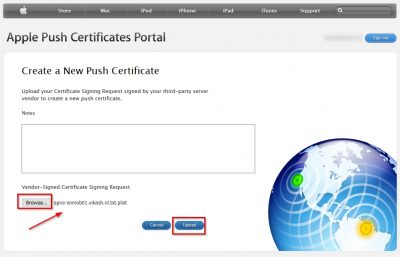
Next you will be asked to upload the signed CSR file (the .plist file). Browse to the file and then click on upload.
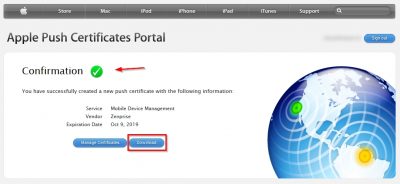
If everything goes well your push certificate should be created. Click Download to save it locally. The filename of the certificate you download here should something like MDM_ Zenprise_Certificate.pem.
Now we need this MDM_ Zenprise_Certificate.pem file to complete the CSR we made earlier on the webserver. This must be the same webserver you generated the CSR on! So, head back to the webserver, in my case it is STF01, to complete the certificate request. IIS Manager should still be open from previous steps in this blog so now you have to choose Complete Certificate Request from the right column.

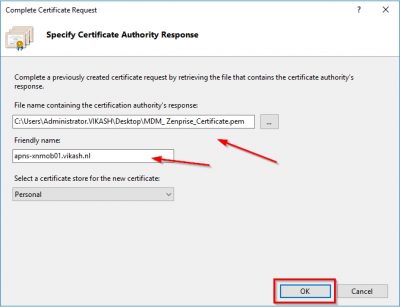
Locate the .pem file you downloaded from Apple and specify a friendly name. This name can be anything. Then click on OK.
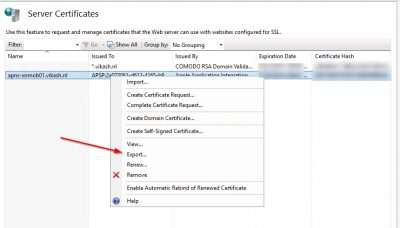
Next step is to export the APNs certificate with the private key, so we can import it in XenMobile. Right click the APNs certificate from IIS Manager and click on Export.
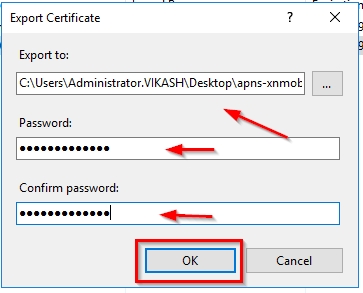
Specify a location, a filename with the extension .pfx and a password. Then click on OK.
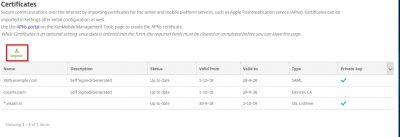
Now let’s head over to the XenMobile web console. The wizard will start automatically after logging in and will take you to the Certificates screen. Click on Import.
Select KeyStore in the Import box. The type should then be automatically set to PKCS#12. Very important to select APNs in the Use as dropdown menu. Browse to the exported .pfx APNs file from a few steps above and also enter the same password for decryption. Then click on Import.
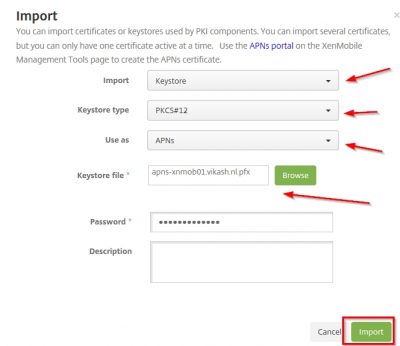
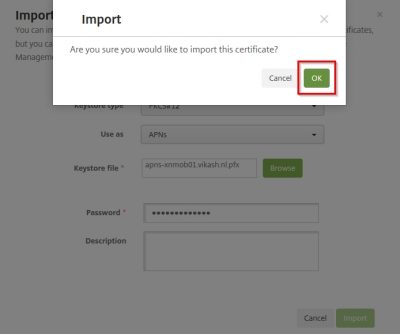
Click on OK in the dialog window to confirm.
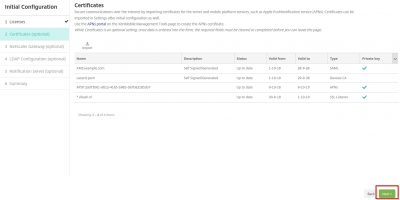
The import will complete successfully, and you should now have all the appropriate certificates installed to continue the Initial Configuration. Click on Next.
XenMobile NetScaler Gateway Configuration

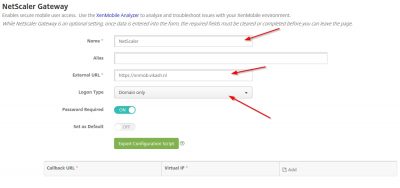
The next step will lead you to the configuration for NetScaler Gateway. This is of course optional. But while we are here we might as well do the configuration. The actual setup and configuration of NetScaler will be another blog post. Enter a name here for NetScaler. The External URL is important because this will be used for Mobile Application Management (MAM). Note also that this is https. I leave the logon type to Domain only for now. Click then on Next.
XenMobile LDAP Configuration

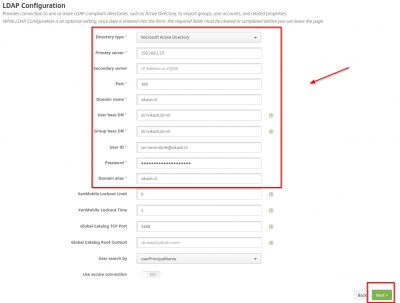
For this step to complete make sure you have a service account for XenMobile configured in your Active Directory. Make sure the password expiration is disabled for this account. Also make sure that you have setup routers and firewalls correctly to allow LDAP (or Secure LDAP) communications to and from the NetScaler. There are also other ports which I will point out in my blog post about configuring the NetScaler but for now we will only need the LDAP port. Fill in the fields according to your environment. I only have one domain controller in my test lab so I enter that in the Primary server field. Because my Active Directory is plain and simple I don’t have complex User base DN or Group base DN. Check the advanced properties of the service account using Active Directory Users and Computers management console to see what they are in your environment.

After entering all the required information, we can click on Next.
Notification Server Configuration

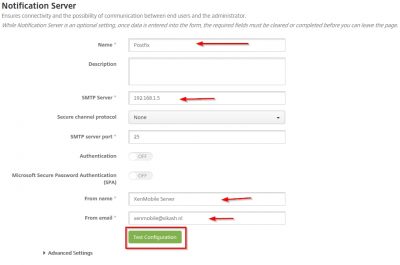
This is the part where you enter your mail server information so XenMobile server can sent notifications. I have Postfix running as my local mail server, so I will enter that information here. You need the IP-address of the mail server and correct port number. Like in the previous step you should make sure that XenMobile Server can communicate on the specified port with the mail server. Enter the information required and click then on Test Configuration.
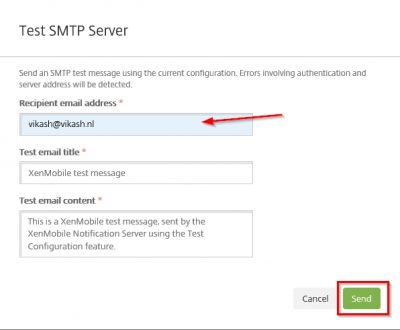
A window will pop up and ask for the recipient email address. Enter a valid email address where the test mail will be delivered to. Then click on Send.
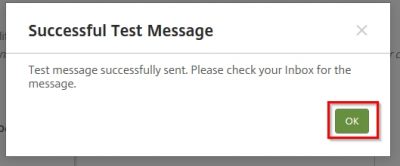
You will get a notification that the mail is sent successfully. Click OK.
You will be prompted with a summary screen. You can now click Finish in the bottom.
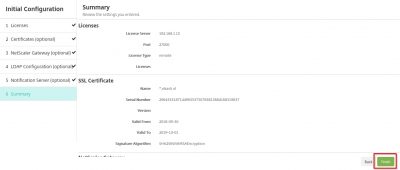
We will now be transported to the main XenMobile management console with a message that we now can start managing XenMobile! How cool is that :).

So now we are almost ready to enroll our devices. The next step is configuring Citrix NetScaler to make XenMobile available in a secure way to our end users. Check that blog post here where I show you how to setup and configure Citrix NetScaler for XenMobile. This concludes this blog post. Feel free to contact me of you have any questions or comments.
You can follow me on twitter or add the RSS feed from my blog and you will be notified when I add new posts.


Setup Citrix Endpoint Management (Citrix XenMobile Server 10.9) Read More