Azure Multi-Factor Authentication Server with Citrix NetScaler

Reading Time: 8 minutes

Azure Multi-Factor Authentication Server with Citrix NetScaler can be very powerful in protecting your infrastructure. NetScaler can use LDAP (or Active Directory) to authenticate users, but to add an extra layer of security we can use Multi-Factor Authentication (MFA). The user will receive a notification in the Microsoft Authenticator app, or a phone call from Azure, when trying to log into for example NetScaler Gateway, after entering their username and password. NetScaler will authenticate the user using Azure and MFA Server.

In this blog I will show you how this can be done. On my NetScaler I have setup full SSL VPN, and will configure the virtual server to authenticate using Azure MFA. I have setup a dedicated Windows 2016 Server on-premise to run MFA Server. On premise MFA Server is the choice if you want to secure VPN’s, IIS based web applications or other on premise applications using LDAP or RADIUS authentication.

Deliverables of this post:

  • Citrix NetScaler SSL VPN using MFA authentication.
  • Setup MFA Server on premise.

Requirements for the configuration:

  • Citrix NetScaler 11.1 (www.citrix.com).
  • Windows 2016 Server.
  • Azure subscription.
  • SSL VPN already configured on NetScaler (see this post).
  • Valid SSL certificate.
  • Active Directory for user authentication.
  • A hostname for the MFA Server, in my case https://mfa.vikash.nl. This must match your SSL certificate.

Setup Azure Active Directory

We have to link our on premise active directory to Azure AD, and sync the users to Azure. So we start by setting up Azure Active Directory. Log into Azure Classic Portal: https://manage.windowsazure.com.

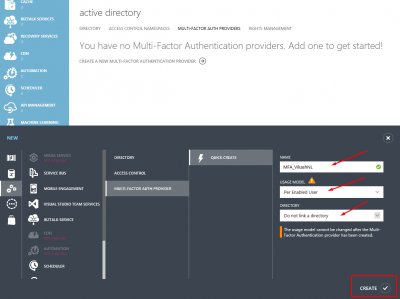
Log into Azure classic portal and navigate to Active Directory in the left column. Click on MULTI-FACTOR AUTH PROVIDERS and then click on CREATE A NEW MULTI-FACTOR AUTHENTICATION PROVIDER.

Give it a name, select the usage model and click CREATE.

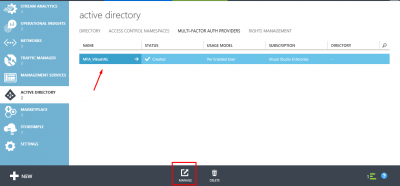
Select the provider you just created, and click on MANAGE on the bottom of the page.

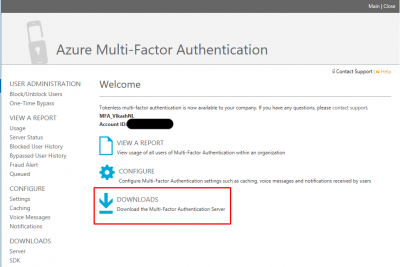
A new browser window will open, and you will be redirected to the Azure Multi-Factor Authentication website to download the MFA Server software. Click on DOWNLOADS.

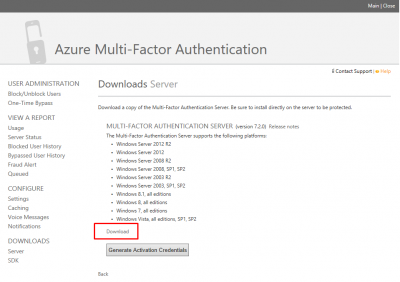
Then click on Download to start the download. Save the setup file on your Windows Server where you want to install the MFA Server software. Leave this page open.

Setup MFA Server

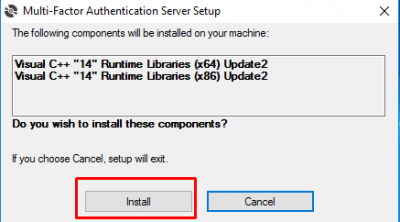
Switch to your Windows Server and start the installation of MFA Server. It will install some runtime libraries, click on Install.

Click on Next.

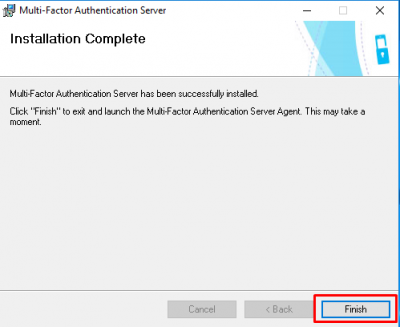
Click on Finish after the installation is complete.

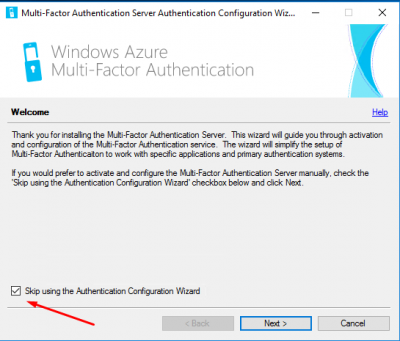
The Configuration Wizard starts. Select the checkbox Skip using the Authentication Configuration Wizard. We will configure MFA manually. Click then on Next.

Activate MFA Server

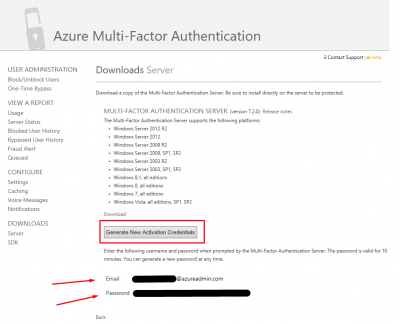
Now we have to link and authenticate our new MFA Server to Azure MFA. Go back to the Downloads Server page, and click on Generate New Activation Credentials. They are only valid for 10 minutes.

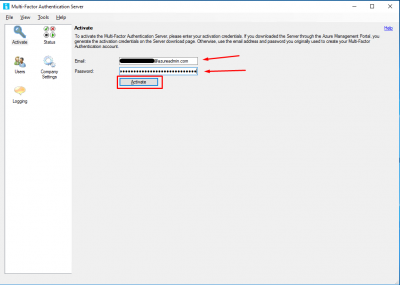
Go back to your MFA Server, where you will be prompted to activate the MFA Server. Enter the Email and Password you got in the step above, and click on Activate.

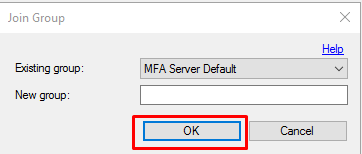
Click on OK on the Join Group window.

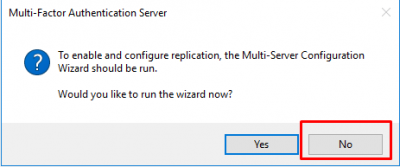
Click on No when asked of you want to run the wizard.

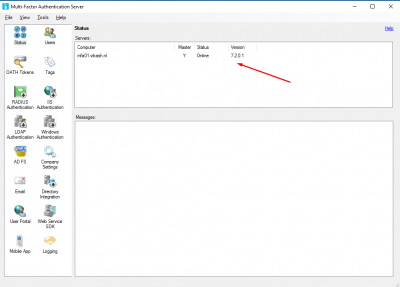
You will see the status of your MFA Server. It should say Online.

Import users to Azure

We have to import the on premise users to Azure. I will connect MFA Server to my Active Directory using a specific account (service account). This is the same service account I am using to connect my NetScaler to my Active Directory.

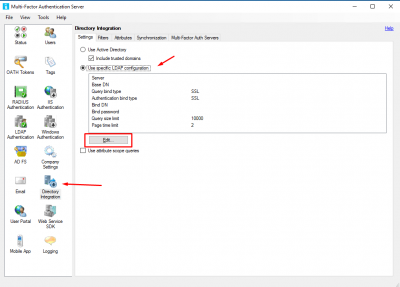
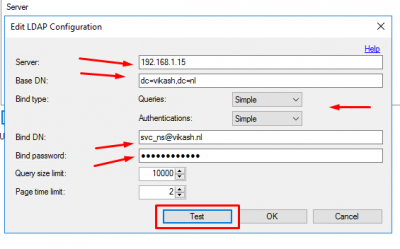
Go to Directory Integration and select Use specific LDAP configuration. Then click on Edit.

Enter the service account details. Set the Queries and Authentications to Simple and click on Test.

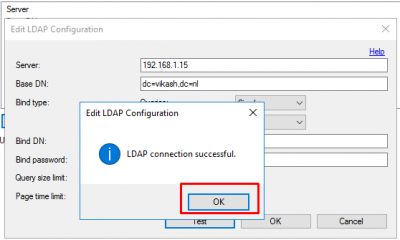
Click on OK on the connection successful dialogue.

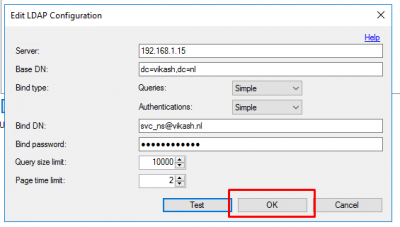
Then click on OK to close the Edit LDAP Configuration window.

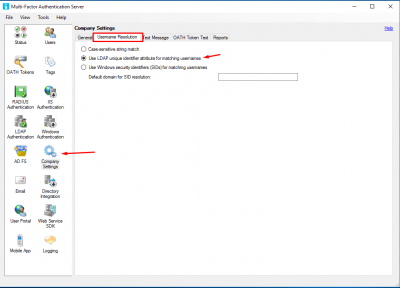
Go to Company Settings and enable Use LDAP unique identifier attribute for matching usernames.

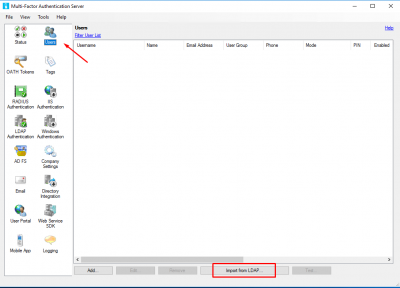
Now MFA Server is setup to read the Active Directory users. Let’s import them. Go to Users and click on Import from LDAP.

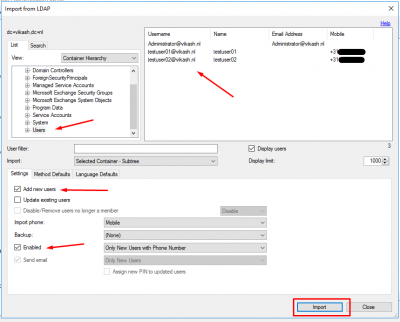
Navigate to the container where your users are. You can then select specific users, or just select the container and then import. Check the box Add new users and also Enabled to enable users where the Phone Number is already in Active Directory. Click on Import.

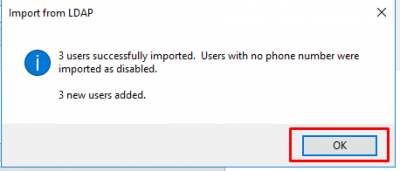
It will tell you how many users were imported. Click on OK.

Test Azure user connection

Now that we have the users in Azure, it is time to test! Let’s see if the MFA Server can communicate with Azure for a specific user we imported.

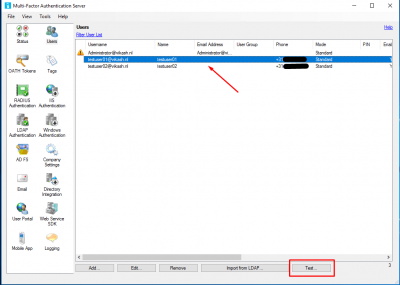
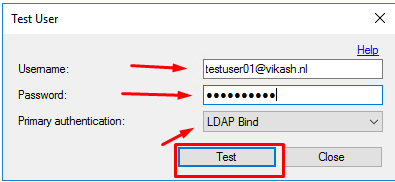
Go to Users and select a user. Click on Test.

You will get a popup asking you for password. Enter the password, and select LDAP Bind. Click on Test.

MFA Server will now connect and authenticate the user on Azure.

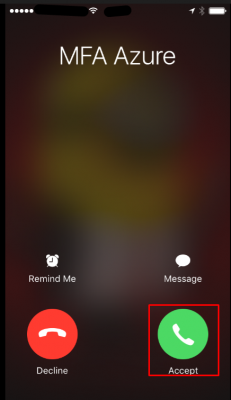
The user will get a phone call from Azure. Tap on Accept.

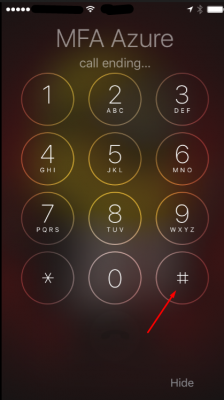
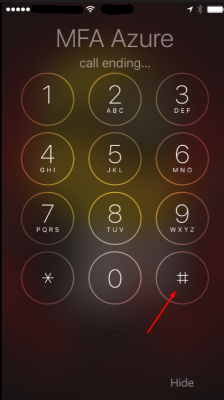
To accept the authentication you have to tap the # key.

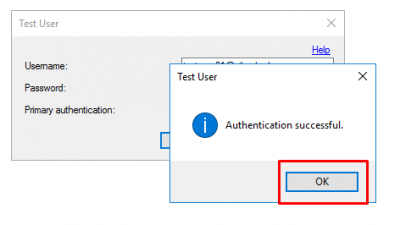
Back on the MFA Server you will now get an Authentication successful message. Click on OK.

Configure NetScaler to use MFA

Before we can configure NetScaler, we have to setup a few things on the MFA Server to allow communications from the NetScaler.

Allow LDAP communication from NetScaler

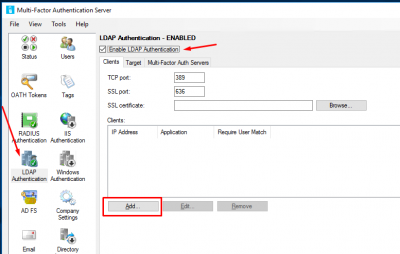
We have to allow LDAP communication for NetScaler on the MFA Server. Go go LDAP Authentication and enable Enable LDAP Authentication. Click on Add.

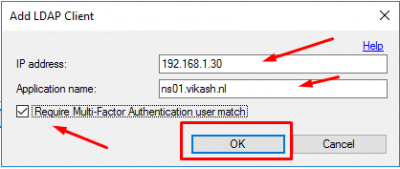
Enter the NSIP of the NetScaler and give it a name. Check the box Require Multi-Factor Authentication user match. Click on OK.

Import LDAP service account

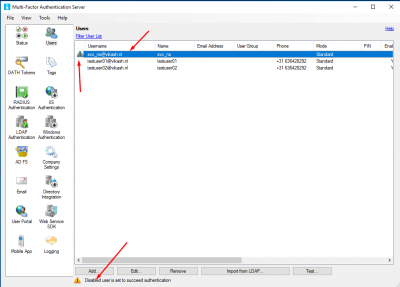
Now go to Users and import the service account you will be using to communicate from the NetScaler to the MFA Server when doing LDAP searches. This user has to be disabled, so make sure the phone number field is empty. Otherwise each time NetScaler queries the MFA Server for LDAP searches, MFA will also call the service account user.

Automatic user synchronization

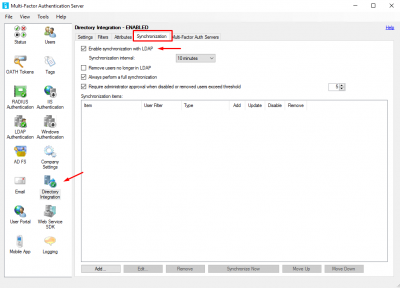
Enable automatic synchronization between Active Directory users and Azure. This way you won’t have to manually add or remove users to Azure (as long as they are in the correct container).  Go to Directory Integration, click on the tab Synchronization and select Enable synchronization with LDAP. Configure the interval as you like.

Add MFA as LDAP Server on NetScaler

Log into you NetScaler management interface. Navigate to System -> Authentication -> LDAP -> Servers. Click on Add.

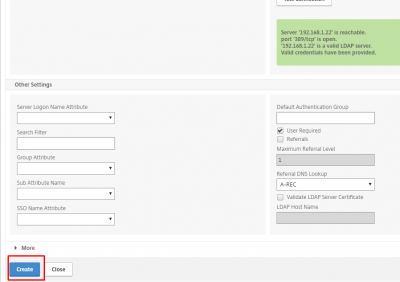
Enter a name, and specify the IP address of you MFA Server as LDAP server. Then enter the information of the service account we will use to authenticate NetScaler to the MFA Server. Make sure to set the Time-out to a time in which the user has to accept the MFA request, either using phone call or the authenticator mobile app. In my case the user has 3 minutes to complete the authentication. Then click on Test Connection. If everything went fine, the green box will appear.

Scroll to the bottom of the page and click on Create.

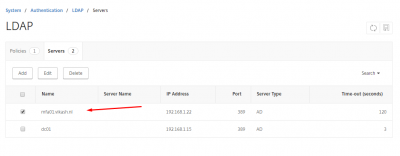
You should now see the MFA Server in your list of LDAP Servers on the NetScaler.

Add LDAP policy for MFA Server on NetScaler

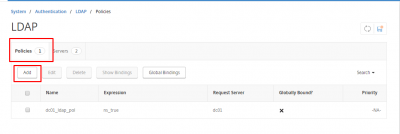
Navigate to System -> Authentication -> LDAP -> Polcies and click on Add.

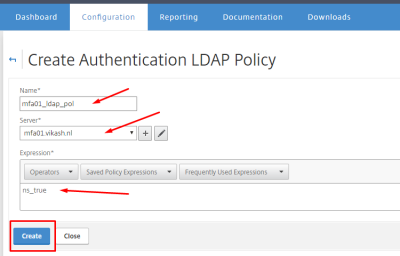
Give it a name, and make sure to select your MFA LDAP Server. Enter ns_true in the expression box and click Create.

Enable MFA Authentication for NetScaler Gateway

In a previous post I setup NetScaler Gateway for SSL VPN. I will modify that to use MFA for authentication. It is the same concept for other NetScaler Gateway Virtual Servers you have.

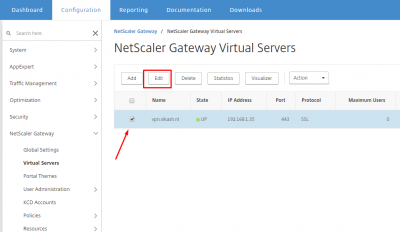
Navigate to NetScaler Gateway -> NetScaler Gateway Virtual Servers. Select your virtual server and click on Edit.

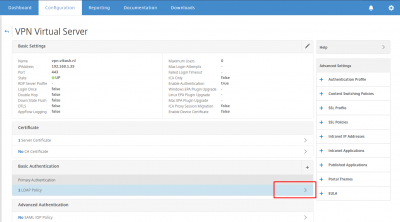
Scroll down to the Basic Authentication section and select your LDAP Policy.

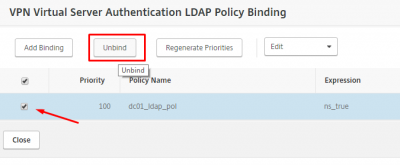
Select the already existing LDAP policy to unbind it. Click on Unbind.

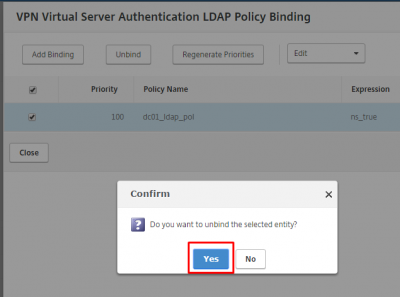
Click on Yes to confirm.

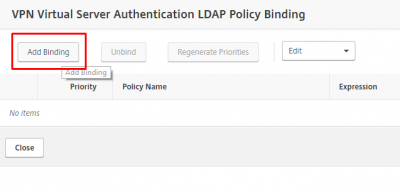
Now we can bind the MFA LDAP Policy we created earlier. Click on Add Binding.

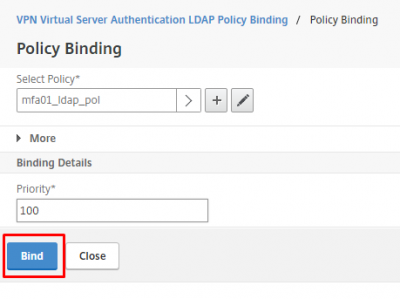
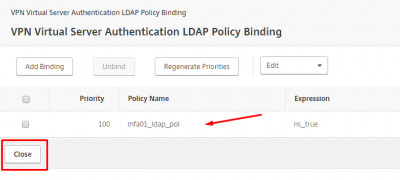
Make sure it the MFA LDAP policy is selected and then click on Bind.

Then click on Close.

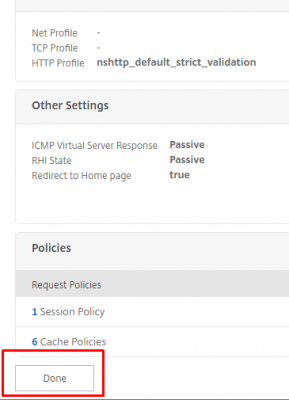
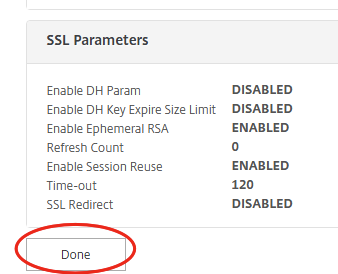
Scroll down to the page and click on Done.

Time for testing

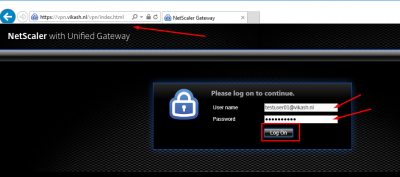
Browse to your NetScaler Gateway page. In my case that is: https://vpn.vikash.nl/. Log in using a user which is enabled for MFA. Click on Log On.

After clicking on Log On the page will not refresh. Remember the Time-Out value we adjusted earlier? This is the time this page will wait for you to authenticate. Azure will now call the user on the phone number supplied. Click on Accept.

Tap on the # key to accept the authentication request.

Then the browser page will refresh, because the NetScaler will receive a successful authentication message from the MFA Server.

You can see this happening when you enable authentication debugging the NetScaler.

The next step is to Setup Azure MFA User Portal for Self Service.

Azure Multi-Factor Authentication Server with Citrix NetScaler Read More

SSL connection from NetScaler to IIS back-end breaks

Reading Time: 2 minutes

SSL connection from NetScaler to IIS back-end breaks when you load balance SSL websites using IIS and Citrix NetScaler. Recently I ran into a problem which, according to this Citrix article, should not be a problem anymore in the most recent Citrix NetScaler build.

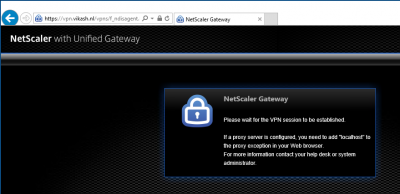
In my case I was trying to load balance two Citrix StoreFront servers. On both servers the StoreFront website was configured to use SSL. Direct connections from end-points were working fine, but when I tried to access the StoreFront page using the load balancing virtual server, I get presented with the SSL certificate (same one I had on StoreFront), and then the website just kept loading while showing only a blank page. I then remembered the Citrix article: https://support.citrix.com/article/CTX205578.

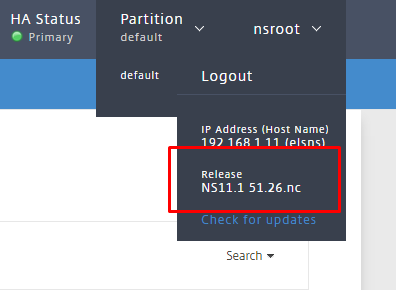
NetScaler version

At this point I was the running the latest version of Citrix NetScaler (11.1 51.26nc).

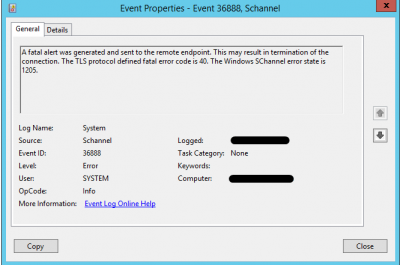
Event ID 36888

I went to my StoreFront server, and opened up the Event Viewer. This was the event ID I saw.

Disable TLS 1.1 and 1.2 on Citrix NetScaler Service Group

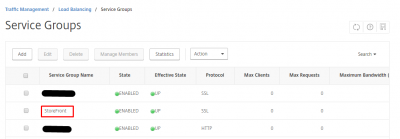
The next step is to disable TLS version 1.1 and 1.2 on the Service Group which I configured on the load balancing virtual server.

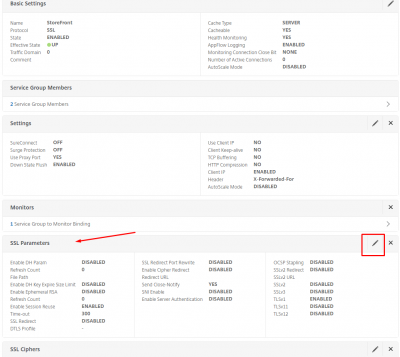
Click on the Edit icon on the SSL Parameters horizontal bar.

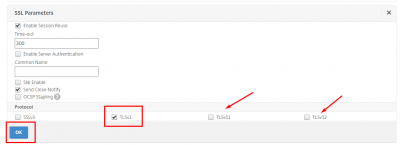
Make sure to uncheck TLSv11 and TLSv12. Leave TLSv1 checked. Then click on OK.

That should do the trick and your SCHANNEL events should not be happening anymore, load balancing virtual server should be working fine and all should be well.

This concludes this blog post. Feel free to contact me of you have any questions or comments.

You can follow me on twitter or add the RSS feed from my blog and you will be notified when I add new posts.

SSL connection from NetScaler to IIS back-end breaks Read More

Full VPN Setup on Citrix NetScaler Gateway

Reading Time: 7 minutes

So you have Citrix NetScaler running to load balance your Microsoft Exchange 2016 infrastructure. What else can you use it for you ask yourself. Well, you know that VPN appliance you have running just for VPN? Get rid of it, because Citrix NetScaler can provide you with full-blown SSL VPN! With Citrix NetScaler VPN you can provide your end-users with full SSL VPN (Virtual Private Network) access in order to ensure that resources in your network are securely accessed. Citrix NetScaler provides access to any device anywhere.

Deliverables of this post:

  • Citrix NetScaler SSL VPN Setup with full access to your network.
  • SSL VPN access using Microsoft Windows 10 desktop.
  • SSL VPN access using Apple iOS (iPhone or iPad).

Requirements for the configuration:

  • Citrix NetScaler 11.1 (www.citrix.com).
  • NetScaler Gateway Universal License.
  • Ip addresses for the virtual server for VPN.
  • Valid SSL certificate.
  • Active Directory for user authentication.
  • A hostname, in my case https://vpn.vikash.nl. This must match your SSL certificate.

My homelab setup
I am running this whole setup from my Microsoft Hyper-V 2016 Server, running all of my Microsoft Windows virtual machines. This Hyper-V Server is also running my Citrix NetScaler.

So let’s start.

Create Session Profile

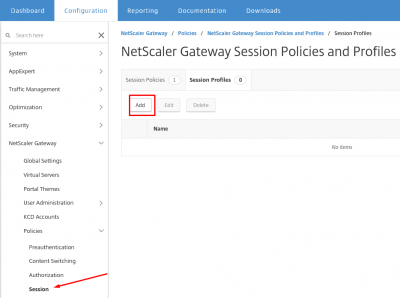
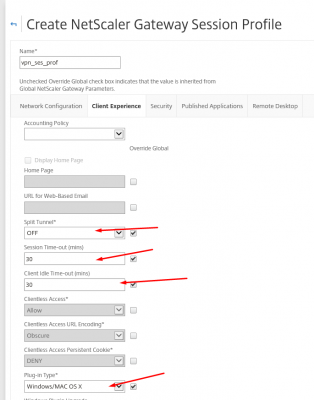
First we have to create the session profile and then the session policy. Navigate to NetScaler Gateway -> Policies -> NetScaler Gateway Policies and Profiles -> Session and click on Session Profiles. Then click on Add.

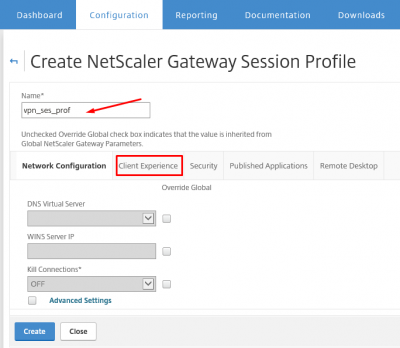
Give the profile a name and click on Client Experience tab.

Set the time-out values according to your needs. Because we want to redirect all the traffic from the client through the SSL VPN tunnel set Split Tunnel to OFF. Set the plug-in type to Windows/MAC OS X.

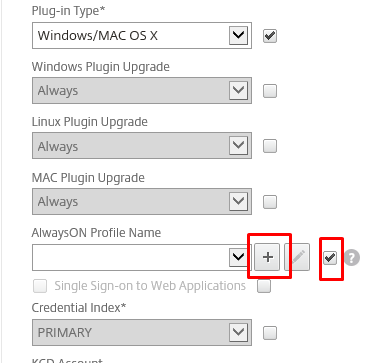
We have to create an AlwaysON profile. Click on the + (plus) sign.

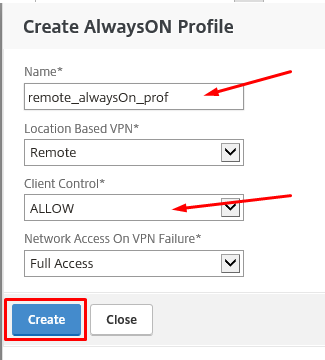
Give the AlwaysON profile a name and set Client Control to ALLOW. Click then on Create.

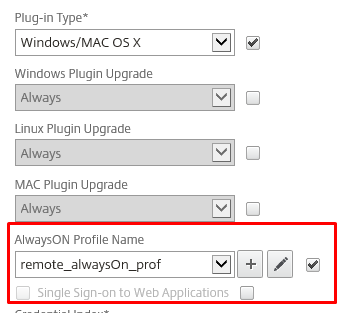
Make sure the AlwaysON profile we just created is selected.

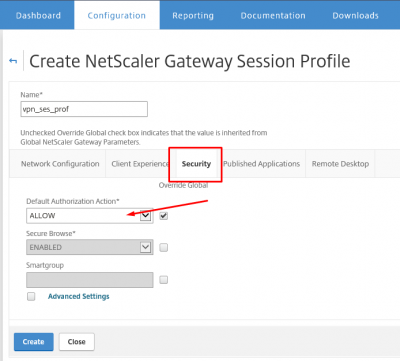
Now click on the tab Security and set the Default Authorization Action to ALLOW.

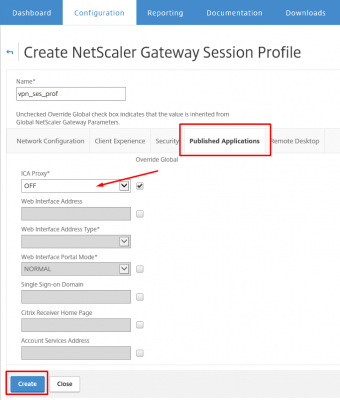
Click on the Published Application tab and make sure that ICA Proxy is set to OFF. Then click on Create.

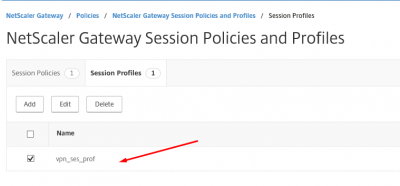
So now your session profile should be available in the Session Profiles overview.

Create Session Policy

After creating the session profile, it is time to create the Session Policy for the session profile we just created. Navigate to NetScaler Gateway -> Policies -> NetScaler Gateway Policies and Profiles -> Session Policies. Click on Session Policies and then click on Add to create a new policy.

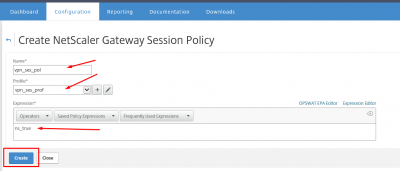
Give the policy and name and enter ns_true in the Expression section. Then click on Create.

The newly created policy should now be available in the Session Policies overview.

Configure the VPN Virtual Server

After creating the profile and policy we can now create the NetScaler Gateway Virtual Server. This is the virtual server providing the VPN access to the end-user. So if you have firewall or nat-appliances, make sure that your external port 443 is redirected to this virtual server.

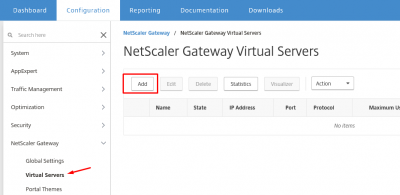
Navigate to NetScaler Gateway -> NetScaler Gateway Servers -> Virtual Servers and click on Add.

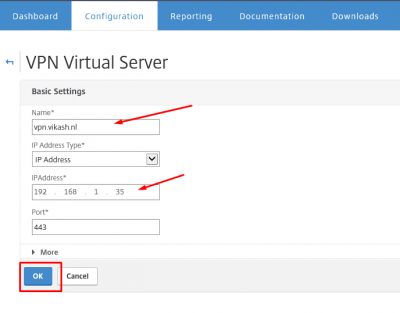
Give the virtual server a name. Set the IP address and click on OK.

Bind the SSL certificate

Let’s bind the SSL certificate to this virtual server. Click here to check my post about importing SSL certificates on Citrix NetScaler. Click on No Server Certificate.

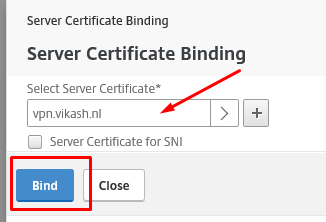
Select the SSL certificate and click on Bind.

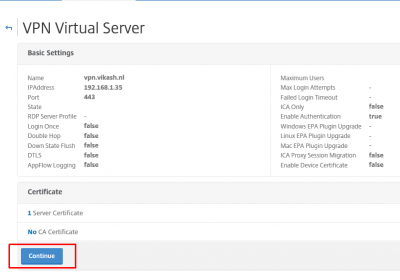
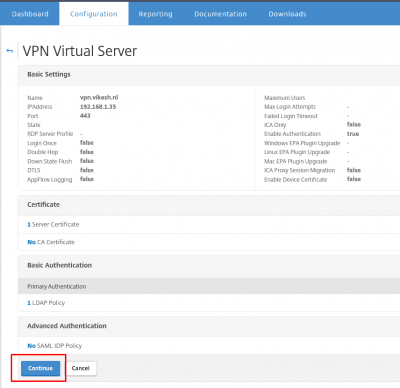
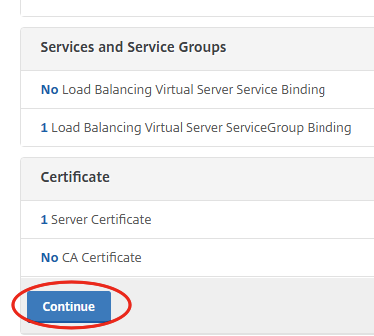
Click on Continue.

Add authentication

I am using my Active Directory as primary (and only) user authentication. If you require second authentication, you can add it here as well.

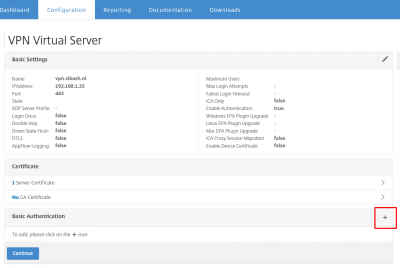
Click on the + (plus) sign on the Basic Authentication horizontal bar.

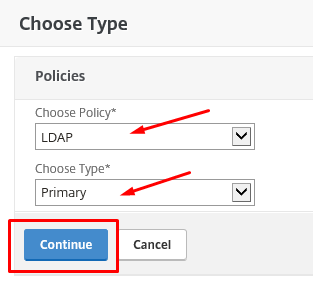
Select LDAP for Active Directory authentication. Choose Primary as Type. Click on Continue.

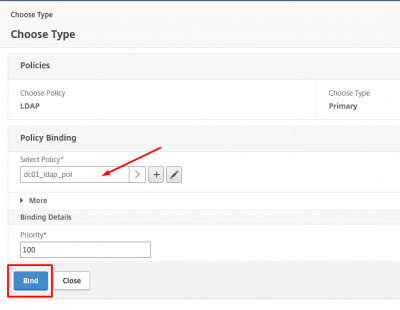
Select your LDAP policy. This contains the Active Directory authentication server. Click then on Bind.

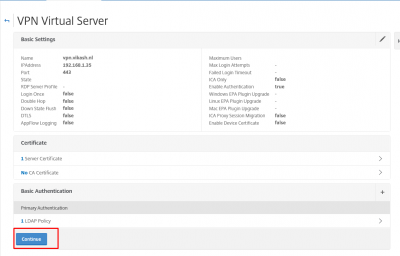
Click on Continue.

And click again on Continue.

Bind the session policy

Now we can bind the session policy created earlier. Click on the + (plus) sign on the Policies horizontal bar.

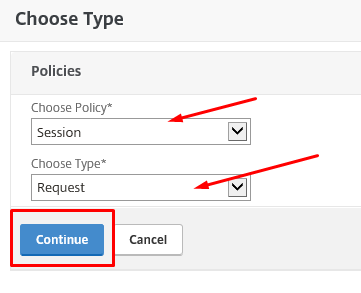
Make sure you have Session as policy and Request as type selected. Click on Continue.

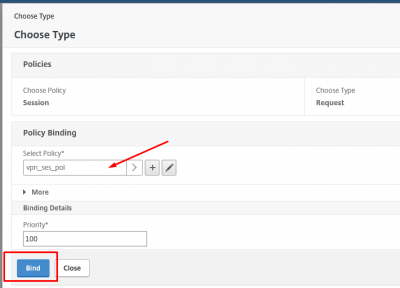
Select the session policy we created earlier in this post and click on Bind.

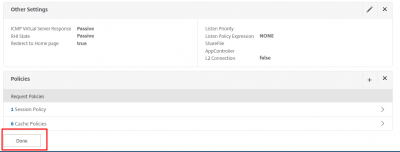
Now click on Done.

In the overview of the NetScaler Gateway Virtual Servers we can see the virtual server being available with status UP.

Testing with clients

So now we have configured the VPN service on Citrix NetScaler, it is time to test it using different endpoints. In my case I will test using a Windows 10 desktop, and an Apple iPhone with iOS 10.2.1.

Windows 10 SSL VPN client

Start a browser on your desktop, and navigate to the hostname where the virtual server is listening. In my case that is https://vpn.vikash.nl. This translates to the IP address of the virtual server on my NetScaler.

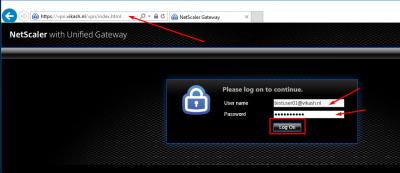
Enter a username and password. Click on Log On.

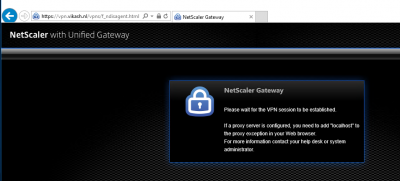
Please wait.

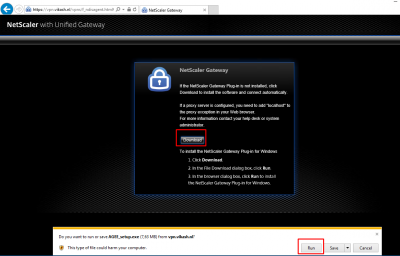
Because this desktop client logs in for the first time, it does not have the NetScaler Access Gateway Plug-in installed. You will be prompted to install it. Click on Download and then Run the installer.

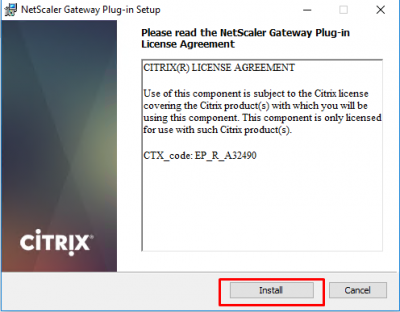
Click on Install.

When the installation process finishes, click on Finish.

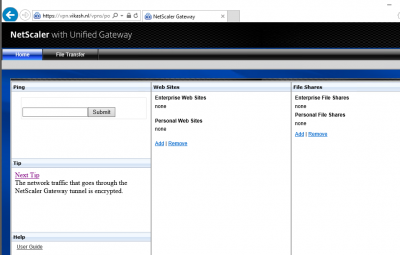
The browser page will refresh, and you will have a full-blown SSL VPN session now using Citrix NetScaler.

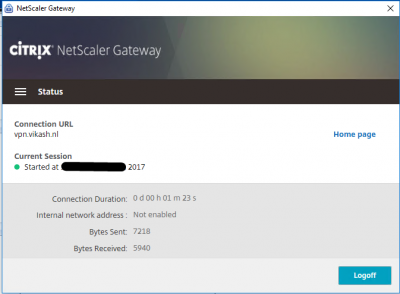
Check the status of the SSL VPN session using the NetScaler Gateway status option by clicking the icon in the notification area in the taskbar.

Apple iOS (iPhone / iPad) client

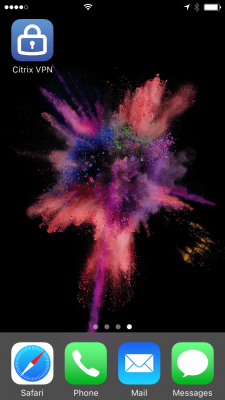
Make sure you have installed the Citrix VPN app from the Apple App Store. Get it here. Start the app on your iPhone.

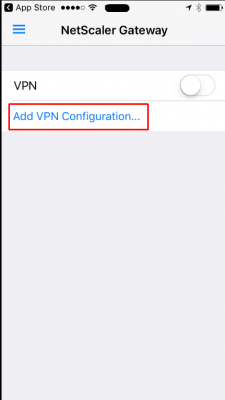
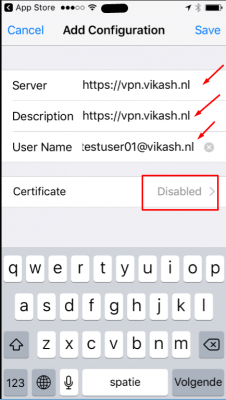
Tap on Add VPN Configuration.

Enter the VPN details and add a user account. Tap on Disabled to set the Certificate options.

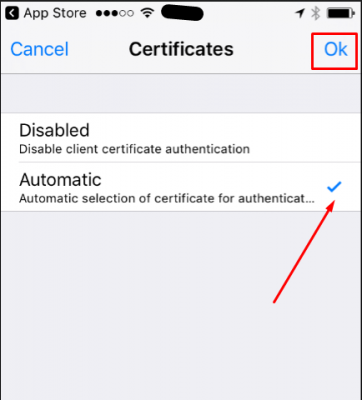
Select the Automatic option. Tap on Ok.

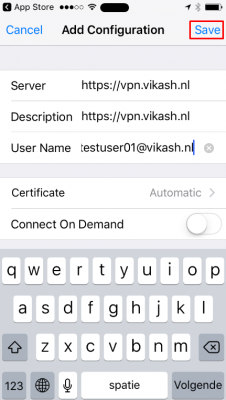
Now tap on Save.

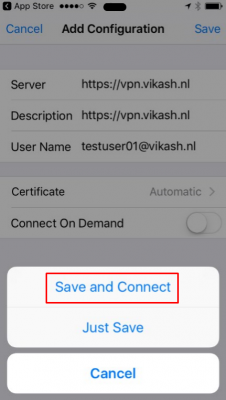
And then tap on Save and Connect to start the VPN connection.

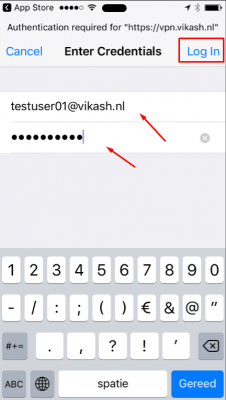
You will be prompted to enter the password for the user. Then tap on Log In.

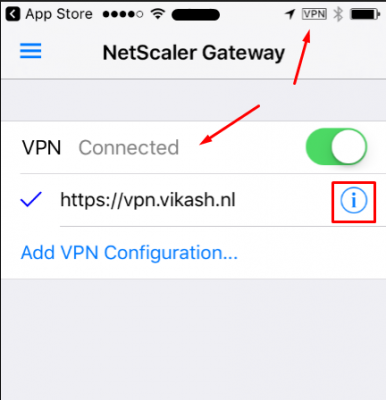
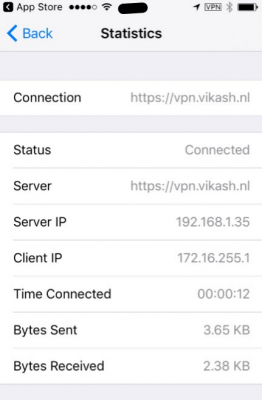
The VPN should now be connected! You can also see the connection status in the app and on the upper-right corner of your iOS device. If you tap op the i next to Connected you can see more information about the VPN session.

This concludes this tutorial. Feel free to contact me of you have any questions or comments.

You can follow me on twitter or add the RSS feed from my blog and you will be notified when I add new posts.

Full VPN Setup on Citrix NetScaler Gateway Read More

Create a backup Load Balancing Virtual Server using Citrix NetScaler

Reading Time: 5 minutes

Citrix NetScaler is very powerful in Load Balancing. In fact Citrix is one of the market leaders in providing flexible and very robust Load Balancing features using NetScaler. To load balance your resources, you have to configure Load Balancing and then create load balancing virtual servers. So that will protect you against a single backend server failure.

But what if you don’t want to balance the load between several backend server, but you only want a certain backend server go active for your end users as a backup in case the primary goes down? And because we have a small setup, we only have one NetScaler running. So no clustering, of high availability whatsoever.

In this post I will show you how you can configure a backup virtual load balancing server for existing load balancing virtual server.

Requirements for the configuration:

  • Citrix NetScaler 11.1 (www.citrix.com).
  • Primary resource (in my case a website).
  • Backup resource (in my case a website).
  • Ip addresses for the virtual servers.

My homelab setup
I am running this whole setup from my Microsoft Hyper-V 2016 server. Also I have deployed two Linux webservers, all very basic.

So let’s start.

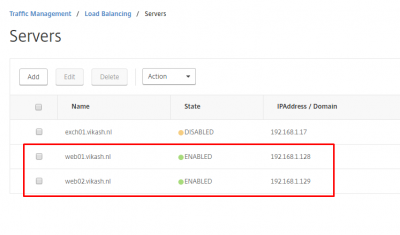
The screenshots below show the actual IP address of webservers running a simple .html page. One is the primary webserver, and the other one I want to become active when the primary goes down.


Set up the Primary Load Balancing Virtual Server

So each website will have it’s own load balancing virtual server. In this way I can define the backup virtual server. I already added both webservers as a Server object.

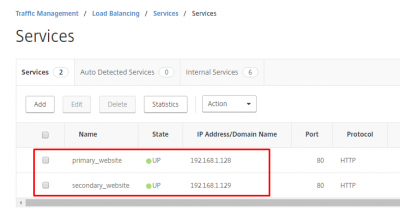
I also created the HTTP service I want to load balance.

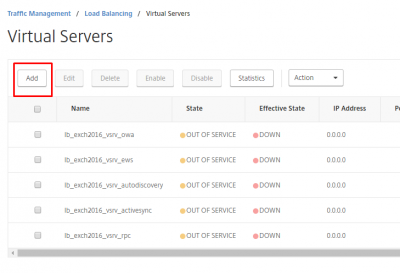
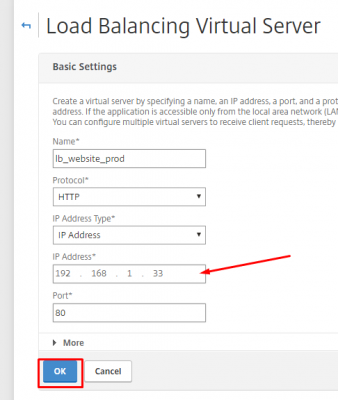
Navigate to Traffic Management -> Load Balancing -> Virtual Servers and click on Add.

Enter the setting for your primary load balancing virtual server. This is the load balancing virtual server where everyone will connect too. This is the one we will configure with the backup load balancing virtual server later on. Enter the required information and click on OK.

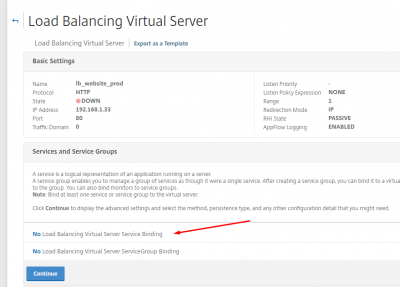
Now add your backend resources to this load balancing virtual server. Remember that is load balancing virtual server is primary, so your primary backend servers will have to be added here. Click on No Load Balancing Virtual Server Service Binding.

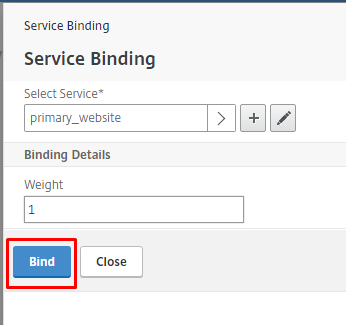
Click on the Select Service option to select the service we want to bind. Then click on Bind.

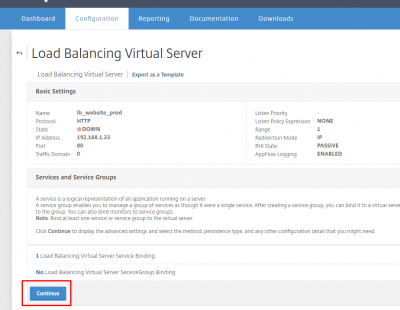
Click on Continue.

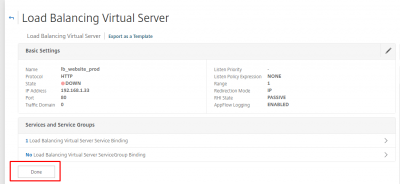
Click on Done.

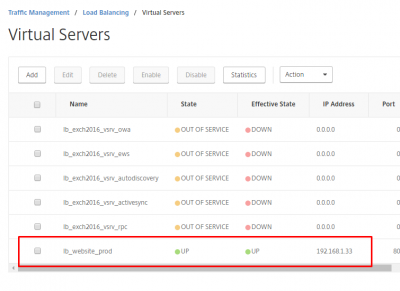
Check the status of the load balancing virtual server. It should say UP.

Now it is time to test. When we browse to the IP address of this load balancing virtual server (192.168.1.33), we should see the webserver I want to be primary.

Set up the Secondary Load Balancing Virtual Server

This second load balancing virtual server will be the backup of the primary one. We will set this one up to connect to my secondary webserver.

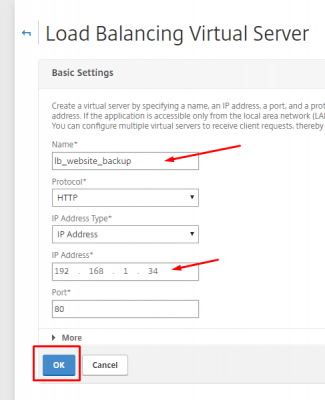
Navigate to Traffic Management -> Load Balancing -> Virtual Servers and click on Add to create a new load balancing virtual server. Then enter the correct settings and click on OK.

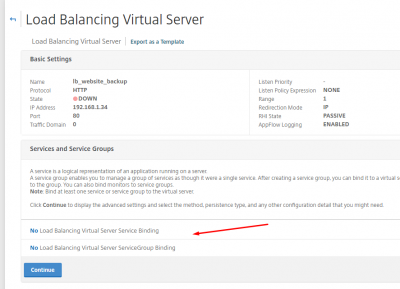
Click on No Load Balancing to add the second webserver as a resource for this load balancing virtual server.

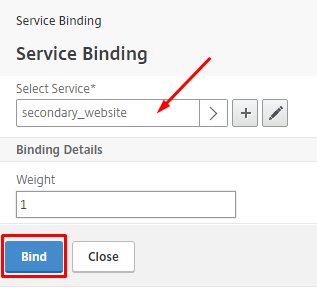
Make sure you select your backup resources here. I selected my secondary web server / website. Then click on Bind.

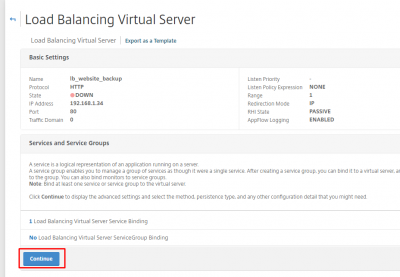
Click on Continue.

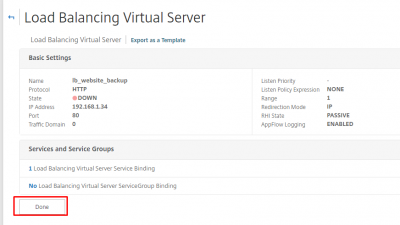
Click then on Done.

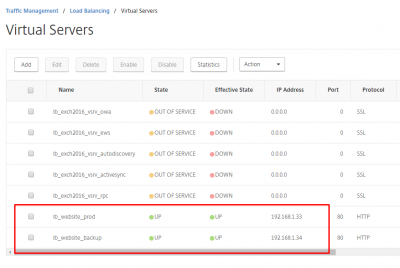
So now you should have two load balancing virtual server with status UP.

Check the secondary load balancing virtual server for connectivity to the second web server.

Set the backup Load Balancing Virtual Server

We have to edit the properties of the primary load balancing virtual server. Using the Protection option we are going to tell it to redirect traffic to the secondary load balancing virtual server, in case it’s own back end server goes down.

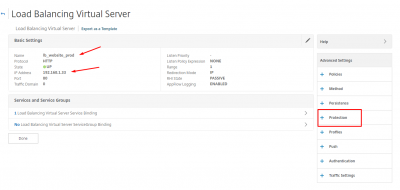
Open the properties of the primary load balancing virtual server and click on Protection.

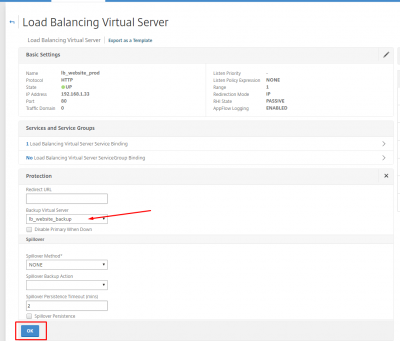
Select the load balancing virtual server you want to use as a backup. In my case I select the load balance virtual server which is redirecting me to my second web server. Then click on OK.

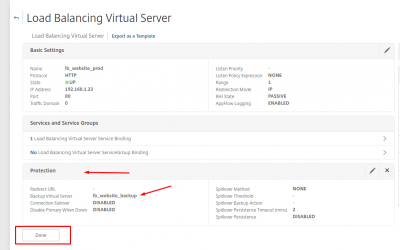
Check if everything is set up correctly and then click on Done.

Do some testing

It’s time to test if the setup works like we want it. I am turning of the primary web server now.

And when I browse to my primary load balancing virtual server now, I am presented with the second web server! A job well-done.

We can see in the log of the NetScaler that it detected the primary web server is down.

This concludes this tutorial. Feel free to contact me of you have any questions or comments.

You can also follow me on twitter or add the rss feed from the blog and you will be notified when I add new posts.

Create a backup Load Balancing Virtual Server using Citrix NetScaler Read More

Load Balancing Microsoft Exchange 2016 with Citrix NetScaler

Reading Time: 8 minutes

Citrix NetScaler is a very powerful and versatile platform for application delivery. Load balancing is one of the key features of Citrix NetScaler. Many organisations are using Microsoft Exchange 2016 to provide email, calendar, tasks and other enterprise collaboration solutions to their employees and customers. Deploying Citrix NetScaler in front of Microsoft Exchange 2016 ensures security, reliability and performance for end-users and IT-engineers. This method is also known as “reverse-proxy” for Microsoft Exchange.

Requirements for the configuration:

  • Citrix NetScaler 11.1 (www.citrix.com)
  • Microsoft Exchange 2016
  • SSL Certificate

My homelab setup
My homelab setup is not that complex. I am running the Exchange 2016 server and the NetScaler as a Hyper-V virtual machine. For load balancing usually you need more then one back-end resource (Exchange 2016 server), but for testing the load balancing concept it’s fine. Also I am using a self-signed certificate. If you run this similar setup in production, you need a valid certificate singed by a public certificate authority.

So let’s start.

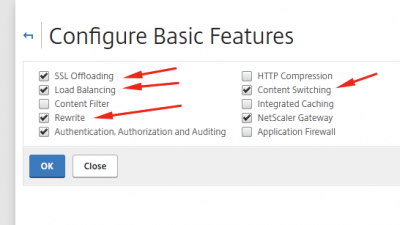
Logon to the NetScaler and go to System-> Basic Configuration and enable the correct featured in the Basic Features panel according to the screenshot below.

ns_lb_exch2016_001

Add Servers (back-end servers)

Let’s add the servers we will be using to load balance. In my case this is my Exchange 2016 Server. When we add the server here, we can later use it in the Service Group as a resource.

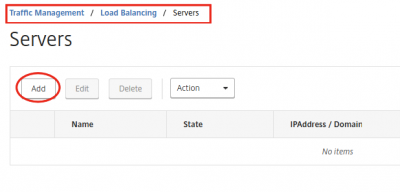
Navigate to Traffic Management -> Load Balancing -> Servers and click on Add.

ns_lb_exch2016_002

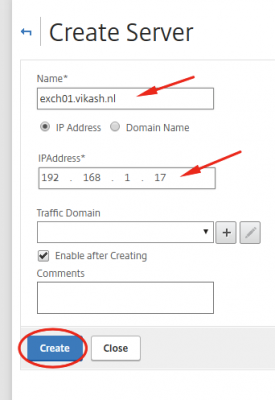
Enter the required information and click on Create.

ns_lb_exch2016_003

Set up Service Groups

We will need a total of five Service Groups. See the table below. Let’s setup the Service Groups needed to feed the Load Balancing vServer.

Load Balancing Service Group NameExchange featureProtocolPort
lb_svg_exch2016_owaOutlook Web AccessSSL443
lb_svg_exch2016_ewsExchange Web ServiceSSL443
lb_svg_exch2016_activesyncActiveSync Service for mobile mailclientsSSL443
lb_svg_exch2016_rpcOutlook Anywhere or RPC over HTTPSSSL443
lb_svg_exch2016_autodiscoveryAutodiscover ServiceSSL443

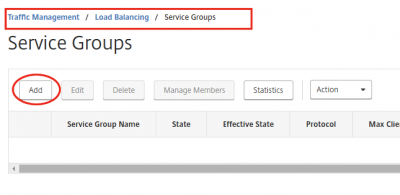
Navigate to Traffic Management -> Load Balancing -> Service Groups and click on Add.

ns_lb_exch2016_004

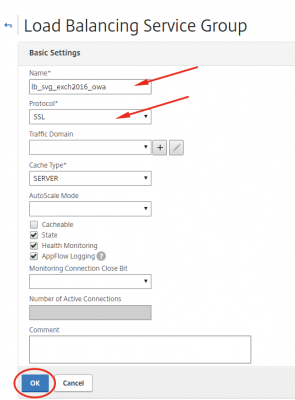
Enter the required information and click on OK. Make sure to choose SSL as Protocol.

ns_lb_exch2016_005

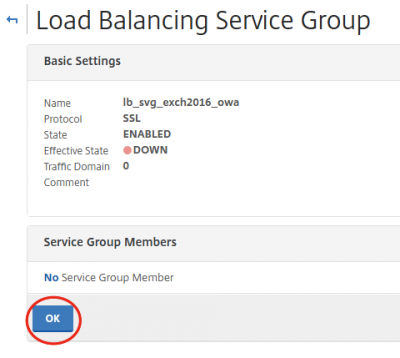
Click then on OK again.

ns_lb_exch2016_006

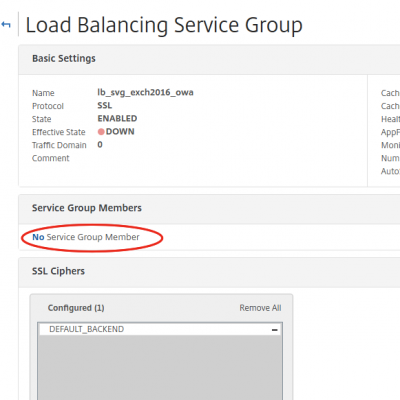
Now we have to assign Service Group members. These are your Exchange 2016 servers off-course. In my case there is only one as I explained earlier in my post. Click on No Service Group Member.

ns_lb_exch2016_007

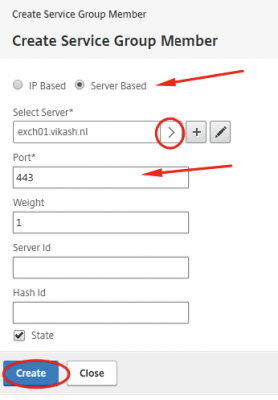
Click on Server Based to select the server you added earlier. In my case that is exchange01.vikash.nl. Make sure you use port 443. Click on Create.

ns_lb_exch2016_008

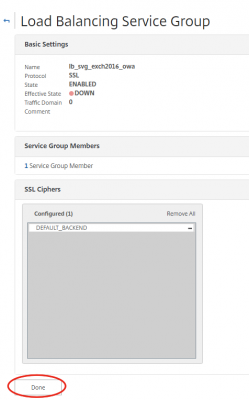
Click on Done.

ns_lb_exch2016_009

You will now be taken to the overview of the Service Groups. Using the steps above create the other needed Service Groups. You can select the lb_svg_exch2016_owa and then click on Add. This is how it should look in the NetScaler interface when you have create all the Service Groups according to the table above.

ns_lb_exch2016_011

Set up Load Balancing Virtual Servers

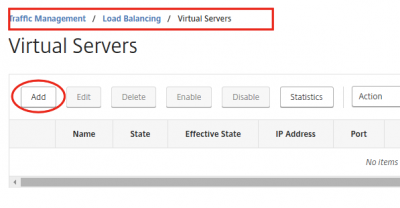
Navigate to Traffic Management -> Load Balancing -> Virtual Servers and click on Add.

ns_lb_exch2016_012

We will create five Load Balancing Virtual Servers. In the table below I have specified them:

Load Balancing Virtual Server nameLoad Balancing function
lb_exch2016_vsrv_owaOutlook Web Access
lb_exch2016_vsrv_ewsExchange Web Services
lb_exch2016_vsrv_autodiscoveryAutodiscover Service
lb_exch2016_vsrv_activesyncActiveSync Service for mobile mailclients
lb_exch2016_vsrv_rpcOutlook Anywhere or RPC over HTTPS

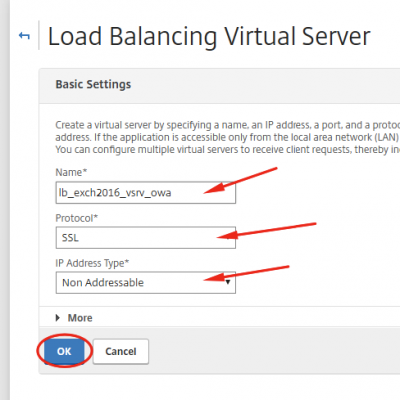
Enter the required information. Make sure you choose SSL for protocol and make the IP Address Type Non Addressable. We don’t want the Virtual Server to be directly accessible on the network. Instead we will use the Content Switching feature of the Citrix NetScaler to direct traffic to where we want it. Click on OK after setting up everything like the screenshot below.

ns_lb_exch2016_013

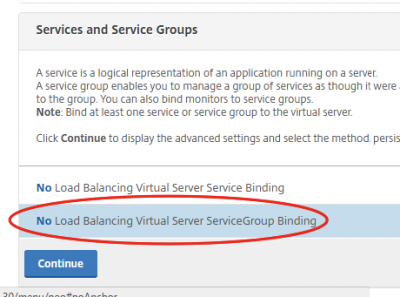
Click on No Load Balancing Virtual Server ServiceGroup Binding.

ns_lb_exch2016_014

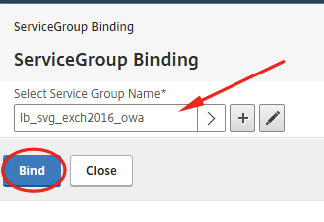
Select the a Service Group to bind and click on Bind.

ns_lb_exch2016_015
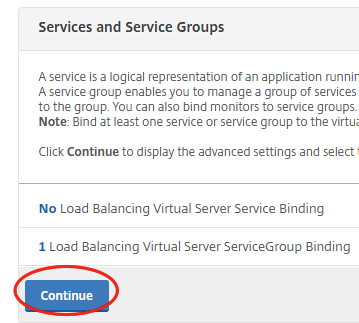
Click on Continue.

ns_lb_exch2016_016

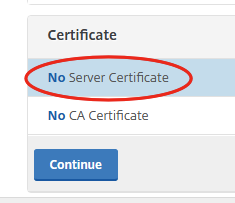
Click on No Server Certificate to bind a certificate.

ns_lb_exch2016_017

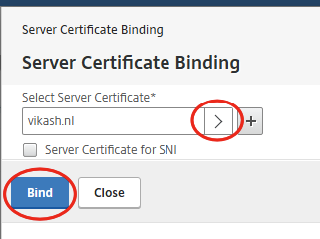
Select the appropriate Server Certificate. In my case this is my self-signed certificate, which is fine for testing purposes. In this post I show you how to import a PFX certificate on the NetScaler. After selecting the correct certificate, click on Bind.

ns_lb_exch2016_018

Click on Continue.

ns_lb_exch2016_019

Click on Done.

ns_lb_exch2016_020

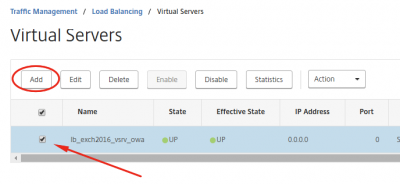
Create the other Load Balancing Virtual Servers like I specified in the table above. Just select the Load Balancing Virtual Server we just added, and click on Add and follow the steps as described above.

ns_lb_exch2016_021

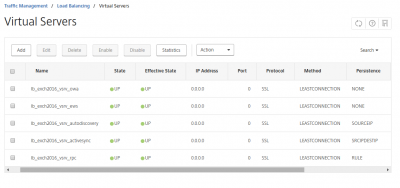
After adding all the Load Balancing Virtual Servers, the list should look like the screenshot below.

ns_lb_exch2016_031

Set up Persistence

Several of the Load Balancing Virtual Server require a different setting for Persistence. In the table below I have specified the settings:

Load Balancing Virtual Server NameExchange FeaturePersistence TypeSetting per type
lb_exch2016_vsrv_owaOutlook Web AccessNONEDefault
lb_exch2016_vsrv_ewsExchange Web ServiceNONEDefault
lb_exch2016_vsrv_activesyncActiveSync Service for mobile mailclientsSRCIPDESTIPDefault
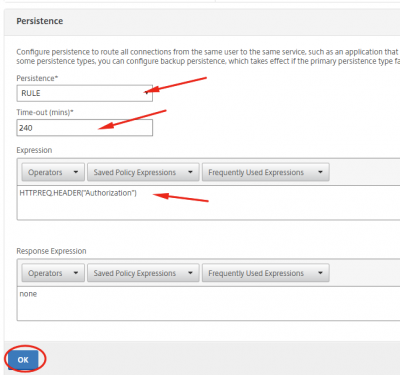
lb_exch2016_vsrv_rpcOutlook Anywhere or RPC over HTTPSRULETimeOut: 240
Expression:
HTTP.REQ.HEADER("Authorization")
lb_exch2016_vsrv_autodiscoveryAutodiscover ServiceSOURCEIPDefault

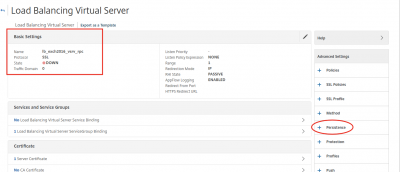
Navigate to Traffic Management -> Load Balancing -> Virtual Server and select lb_exch2016_vsrv_rpc. Then click on Edit. You will should see the screen below. Click on Persistence in the right column of the page.

Select the setting for this specific virtual server in the drop-down menu. Enter the expression HTTP.REQ.HEADER(“Authorization”) and click on OK.

Click on Done.

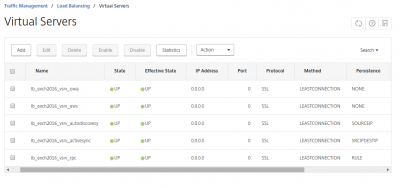
Now do the same for the other load balancing virtual servers. Check the table for the specific settings. In the end you should end your Virtual Server should look like the screenshot below.

Set up Content Switching Virtual Servers

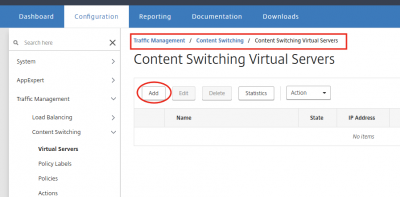
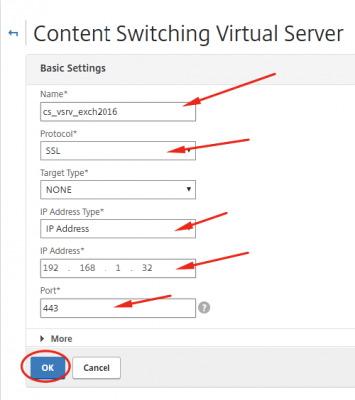
The content switching server will redirect the traffic to the appropriate load balancing server. After creating the content switching virtual server we will define the content switching actions and policies, and bind them to the content switching virtual server. Navigate to Traffic Management -> Content Switching -> Content Switching Virtual Servers and click on Add.

Enter the information and make sure you use a new IP address and port 443.

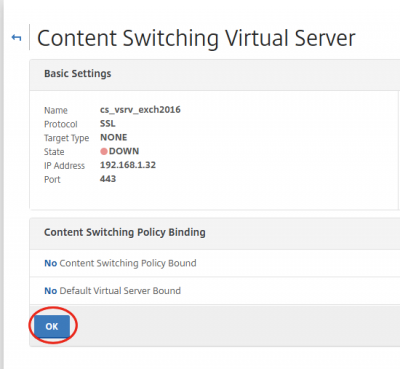
Click on OK.

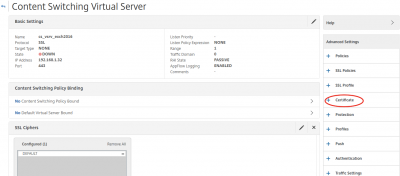
Now we have to bind the SSL certificate. Click on Certificate in the right column.

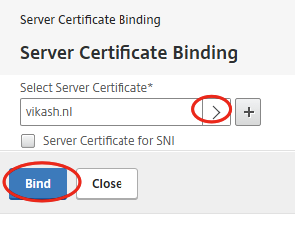
Select the certificate (in my case vikash.nl) and click on Bind.

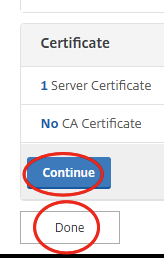
Click on Continue and then on Done.

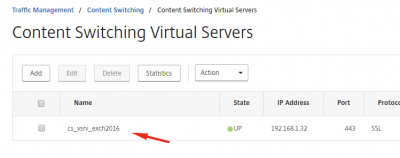
We can now see that the virtual server is up.

Create Content Switching Actions

Now we have to create the content switching Actions. These actions will send the traffic to the appropriate backend load balancing virtual server.

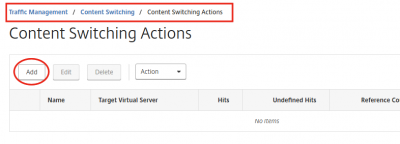
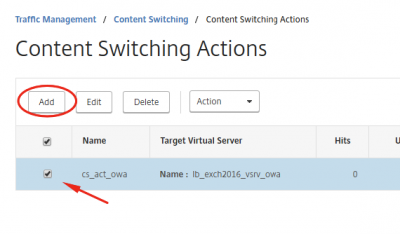
Navigate to Traffic Management -> Content Switching -> Content Switching Actions and click on Add.

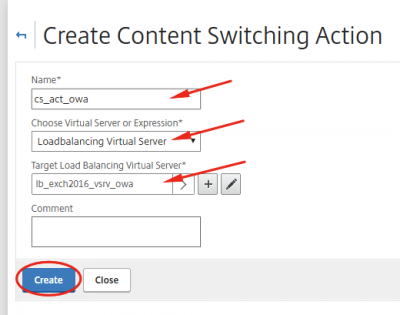
Fill in the name, select Loadbalancing Virtual Server and select one of the Load Balancing Virtual Servers. In my screenshot I start with the load balancing server for Outlook Web Access. Click then on Create.

Now select the content switch action we just created, and then on Add. This will duplicate the switch action, making it easier to adjust settings for the following switch actions.

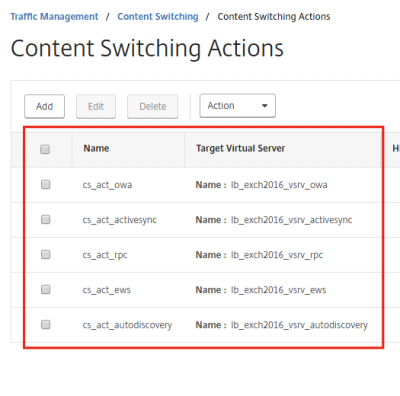
In the end you should have all the load balancing virtual servers connected to a specific content switch action, and your screen should look something like the my screenshot below.

Create Content Switching Policies

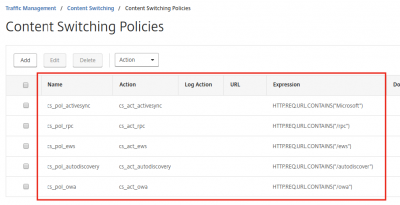
In the content switching policies we will tell Citrix NetScaler where to redirect the requests to. In the table below I have created an overview of the policies.

Policy NameExpressionAction
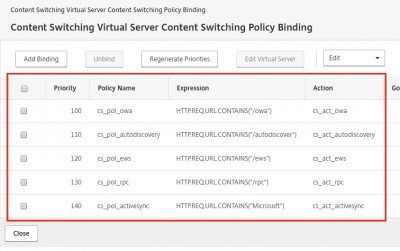
cs_pol_activesyncHTTP.REQ.URL.CONTAINS("Microsoft")cs_act_activesync
cs_pol_rpcHTTP.REQ.URL.CONTAINS("/rpc")cs_act_rpc
cs_pol_ewsHTTP.REQ.URL.CONTAINS("/ews")cs_act_ews
cs_pol_autodiscoveryHTTP.REQ.URL.CONTAINS("/autodiscover")cs_act_autodiscovery
cs_pol_owaHTTP.REQ.URL.CONTAINS("/owa")cs_act_owa

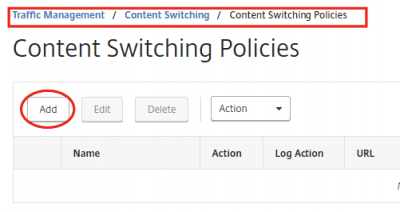
Navigate to Traffic Management -> Content Switching -> Content Switching Policies and click on Add.

Give a name and select the appropriate action. Fill in the correct expression (see table above) and click on Create.

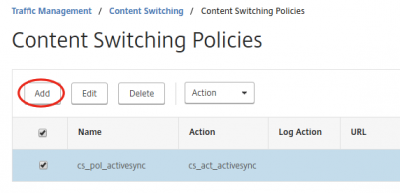
Now select the content switch policy we just created, and then on Add. This will duplicate the switch policy, making it easier to adjust settings for the following switch policies.

In the end your list of policies should look like my screenshot below.

Bind Content Switching Policies

Now we have to bind the content switching policies to the content switching virtual server. This is the server where all the traffic comes in, and according to the policies the NetScaler redirect the traffic.

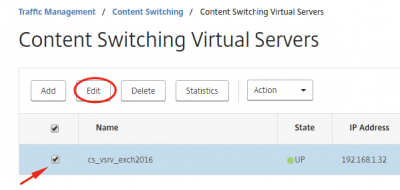
Navigate to Traffic Management -> Content Switching -> Content Switching Virtual Server. Select the content switching virtual server and click on Edit.

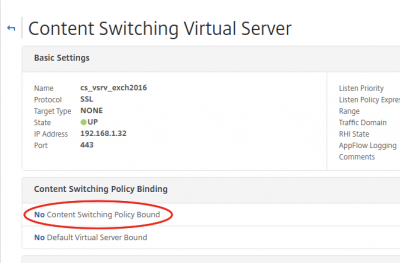
Click on No Content Switching Policy Bound to bind the policies.

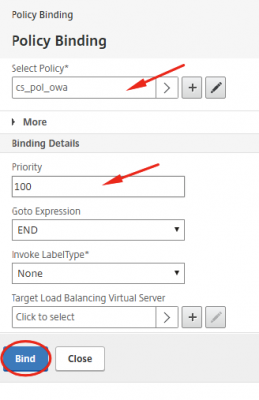
Select the policy and set the priority. Click then on Bind.

Do the same for all the policies. Your screen should look like my screenshot below.

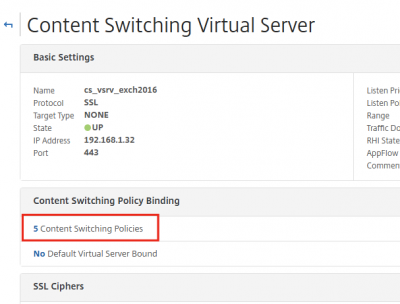
You should have 5 content switching policies bound to the switching virtual server.

Testing

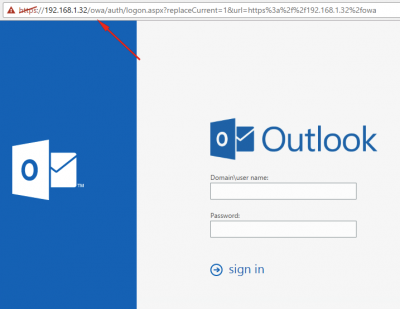
Now you can test! You should be able to connect to the ip address of the content switching server and it should redirect you to the appropriate resource on the backend.

This concludes this tutorial. Feel free to contact me of you have any questions or comments.

You can also follow me on twitter or add the rss feed from the blog and you will be notified when I add new posts.

Load Balancing Microsoft Exchange 2016 with Citrix NetScaler Read More
Import pfx SSL Certificate on Citrix NetScaler

Reading Time: 2 minutes

Import pfx SSL certificate on Citrix NetScaler is something you will do when using Citrix NetScaler. This proces is easy, so just a quick blogpost about that. Just make sure that your pfx file contains the certificate and the private key. Also make sure that it is password protected and keep it in a safe place. You don’t want this falling into the wrong hands.
Requirements for the upgrade:

  • SSL certificate with private key in .pfx format
  • Citrix NetScaler 11.1

So let’s start.

Importing SSL certificate

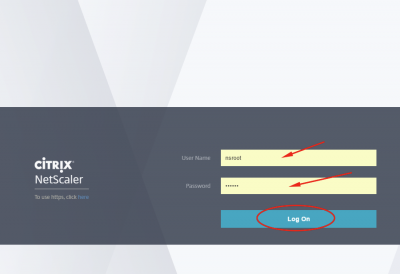
Browse to the NetScaler GUI using a webbrowser and login. In my case I use the nsroot account.

install_pfx_netscaler_11-1_04

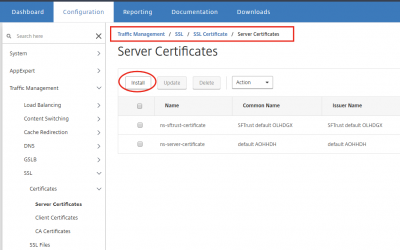
Go to Traffic Management -> SSL -> Certificates -> Server Certificates and click on Install.

install_pfx_netscaler_11-1_01

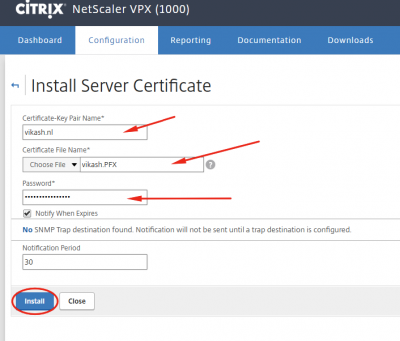
Enter a name and browse to your .pfx file using the Local option (click on the arrow after the word Choose File). Then enter the password for the .pfx file and click on Install.

install_pfx_netscaler_11-1_02

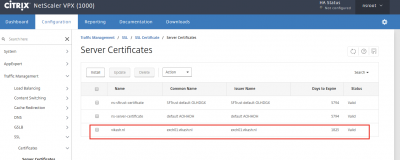
You should see now that your certificate is available to use on the NetScaler.

install_pfx_netscaler_11-1_03

So that’s it.

This concludes this tutorial. Feel free to contact me of you have any questions or comments. You can also follow me on twitter or add the rss feed from the blog and you will be notified when I add new posts.

Import pfx SSL Certificate on Citrix NetScaler Read More