ProtonMail Bridge SMTP config with Apple Mail on macOS Big Sur
ProtonMail with ProtonMail bridge
In this post I will show you how to properly configure ProtonMail Bridge SMTP config with Apple Mail on macOS Big Sur. Online privacy is something I am very concerned with and that’s why it was a logical move for me to switch to ProtonMail. You can argue why not self host? Well for my personal situation I think setting up and maintaining a mailserver is just not worth my time. I am happy to pay ProtonMail and have my mind at ease.
If you found this post you most likely already know what ProtonMail Bridge is. Let me quote them because it basically explains it all:
ProtonMail Bridge is an application available to all paid users that enables the integration of your ProtonMail account with popular email clients, such as Microsoft Outlook, Mozilla Thunderbird, or Apple Mail. Bridge runs in the background by seamlessly encrypting and decrypting messages as they enter and leave your computer. The app is compatible with most email clients supporting IMAP and SMTP protocols.
The situation at hand
I must say I love their webmail solution but I still prefer using a dedicated mail app on my MacBook. Since I am on macOS I use Apple Mail because I fulfils my every need for a simple straight-forward mail client. I am hoping that they eventually develop a dedicated app for macOS just like the app on iOS (I hope you read this ProtonMail :)). Anyway, after installing the ProtonMail Bridge app I followed their manuals for setting up Apple Mail. You can find their manuals here. Basically ProtonMail Bridge creates a profile which you have to accept and install. This profile then automatically configures Apple Mail. Great!
To make sure that everything works I rebooted my MacBook before starting Apple Mail. Immediately my ProtonMail mails and folders started to show up in Apple Mail. Very nice! Then I wanted to test if I could send emails from Apple Mail but I just got an error that there was no SMTP server configured….what now?
Manual setup SMTP server settings
So it turns out that the profile which is created with the ProtonMail Bridge app on your MacBook does not install a SMTP server configuration for Apple Mail. I then went to the website of ProtonMail to check their knowledge base. I did not find any articles there on how to setup a manual configuration on Apple Mail. They do have a article which you can use here but no SMTP configuration in there.
BUT if you open up ProtonMail bridge and click on your account you will see a Mailbox configuration option:
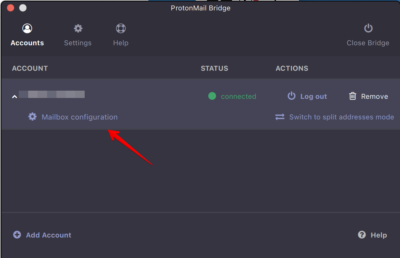
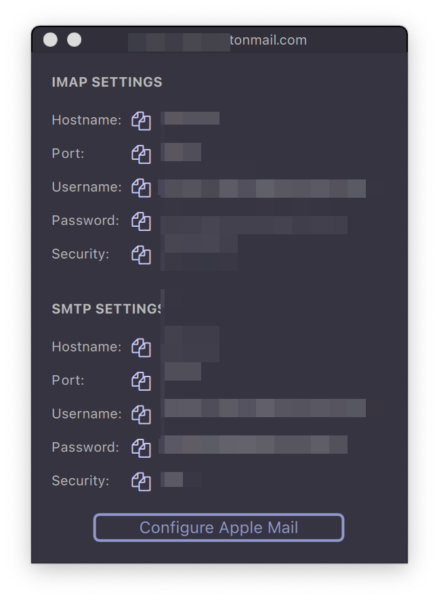
Click on Mailbox configuration to reveal the SMTP information required for Apple Mail:
What is this error?
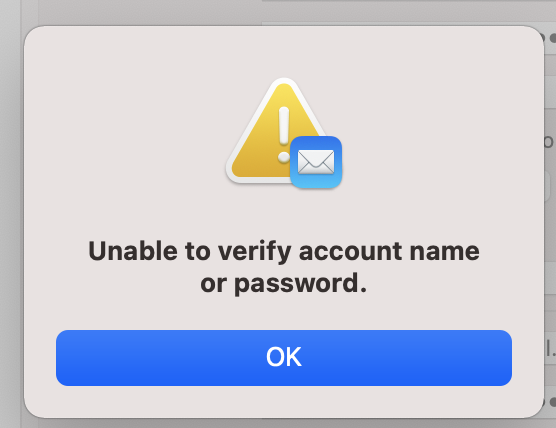
So if you just get the information from the window as described above and enter it in Apple Mail you will get the following error “Unable to verify account name or password.”:
This happens because ProtonMail bridge creates a local SMTP server with default settings for ProtonMail. These defaults are:
- Hostname 127.0.0.1
- SMTP port 1025
- Username <generated during account setup>
- Password <generated during account setup>
- Security STARTTLS
Manually entering this information in Apple Mail did not work and just shows the error you see in the image above: Unable to verify account name or password.
Proper setup for SMTP in ProtonMail Bridge
I did try reinstall of the profile and also reboot. This does not work. Also when I reboot my MacBook I get an error from ProtonMail Bridge telling me port 1025 is in use. Clearly this is not a working setup.
Then the troubleshooting started and I found out what configuration will work! Open the ProtonMail Bridge and click on Settings. Then click on Change IMAP & SMTP settings:
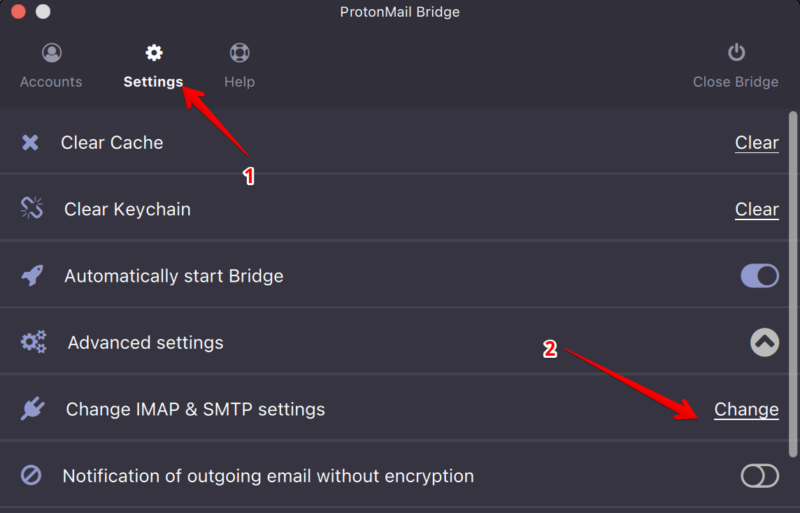
Change the following things:
- SMTP port: change this to 2025
- SMTP connection mode: change this to SSL
Click on Okay.
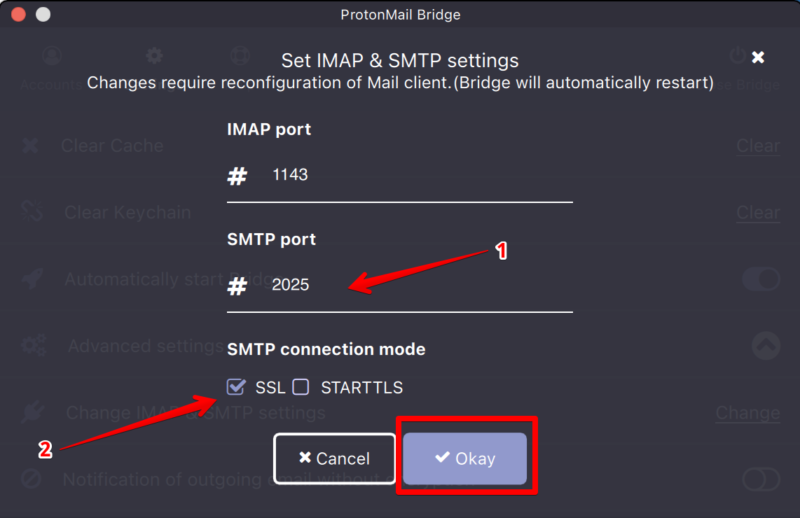
After changing these settings it is very important to reboot you MacBook. I found that only restarting the ProtonMail Bridge app is not enough.
Proper setup for ProtonMail SMTP server in Apple Mail
Now that your Mac is rebooted is time to setup SMTP with the new settings in Apple Mail.
Open Apple Mail and then go to Preferences. The go to the Accounts Tab. In the left column select your ProtonMail account and then click on the Server Settings tab.
In the Server Settings tab you need to enter the following information in the Outgoing Mail Server (SMTP):
- Account: select your ProtonMail account
- Username: <yourProtonUserName>
- Password: this is the password shown in ProtonMail Bridge Mailbox configuration window
- Hostname: 127.0.0.1
- Automatically manage connection settings unchecked
- Port: 2025
- Use TLS/SSL: checked
- Authentication: Password
The screen should like this:
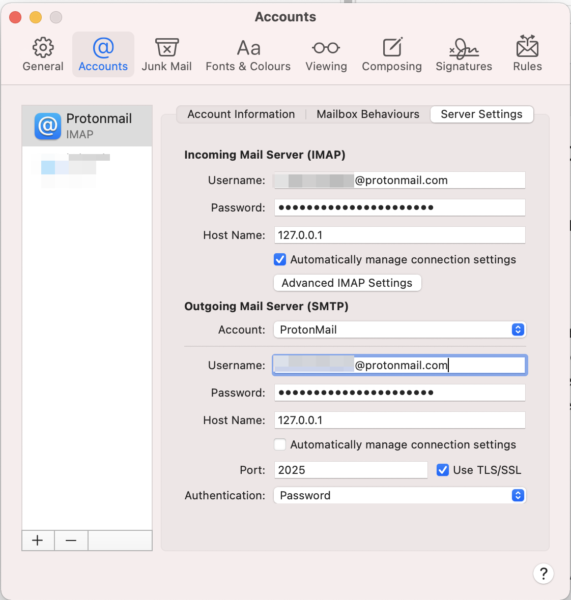
With the settings above and the adjustments in ProtonMail Bridge app you should now be able to send mails using ProtonMail in Apple Mail! ProtonMail is already amazing and with this little addition I hope you can enjoy it much more :). This is everything you need to setup ProtonMail Bridge SMTP config with Apple Mail on macOS Big Sur.
ProtonMail Bridge SMTP config with Apple Mail on macOS Big Sur Read More

